TABLE OF CONTENTS
Introduction
This article will cover the instructions on how approval managers set up and manage the approval flow for employees.
Note - The Settings regarding the Approval Flow, setting time limits before departure to the number of hours that approval notifications will be set and the ticketing time limit management can be found in Travel Approval Settings of each travel group. More about it can be found on the following documentation page - Travel Approval Settings
Thomalex system has two types of Approval Flow - Standard Approval Flow and Approval Rules.
Approval Rules are enabled in Website Settings while "Standard Approval Flow" is enabled for each newly created corporation per default.
Pathway to activate Approval Rules: (Ask for assistance from Thomalex Support Team to assist you in enabling it)
Dashboard → Websites → Edit Website → In Website Settings find the following option:
 Image no.1 Approval Rules Website Settings Location
Approval Management
There are two types of Approver accounts in Thomalex System. Standard Approver Account and the Alternative Approver.
Travel Approver is Responsible for approving the reservations for whom the approval policy is enabled.
Alternative Approver presents an approver role that has an alternative function to the primary approvers.
The approver must be assigned to the employee, not vice versa. When the approver logs in, they can see all bookings from the employees for whom they are assigned as an approver.
One approver can be assigned to multiple travel groups and multiple employees.
First, a website or travel group administrator must enable the "Approval Policy active" feature to activate the approval policies.
Pathway to locate employee accounts that can be edited and set with the approval policy:
Corporate Site → Edit Travel Group → List Employees → Edit the profile for whom the approval policy needs to be activated:
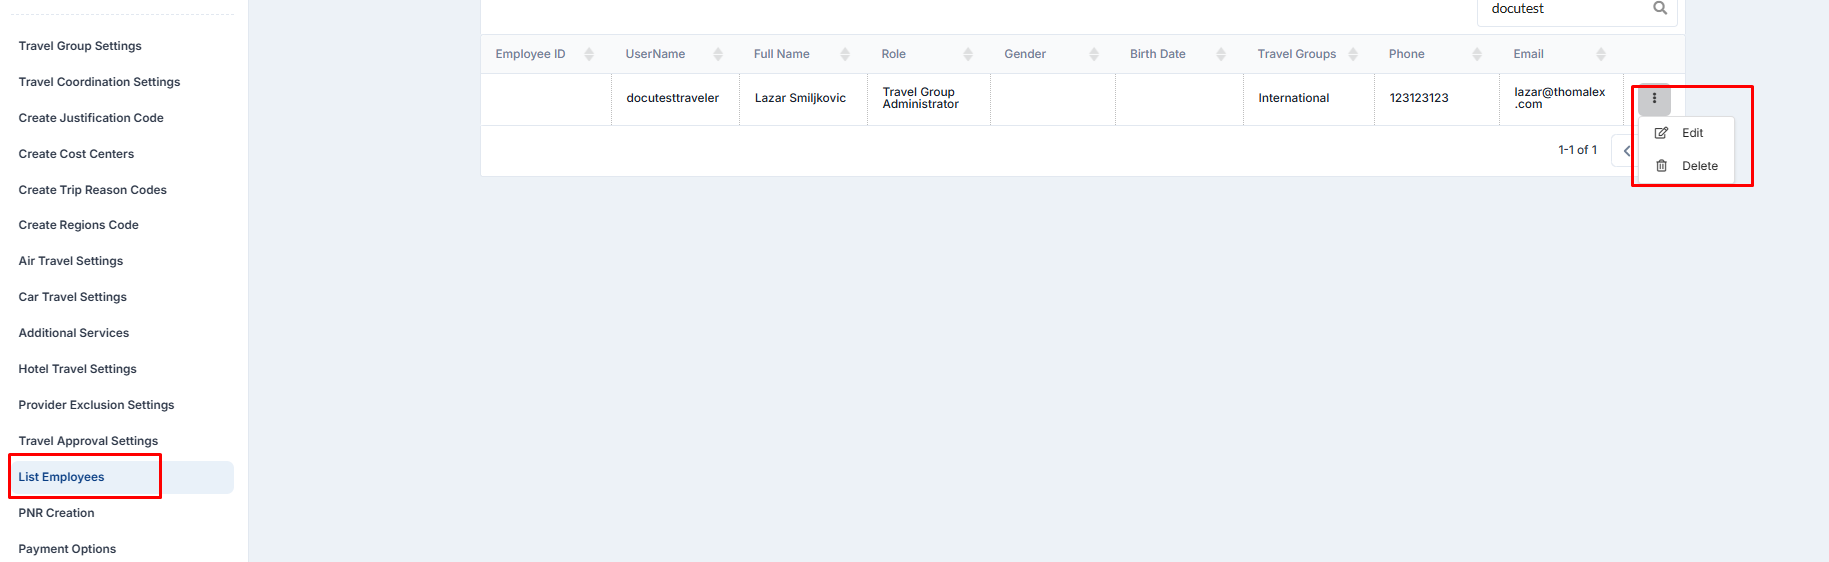
Image no.2 Edit Profile Location
After you have edited the employee for whom the approval policy needs to be activated, select the "Manage Approval" tab and turn on the option called "Approval Policy Active" as seen in the example below:
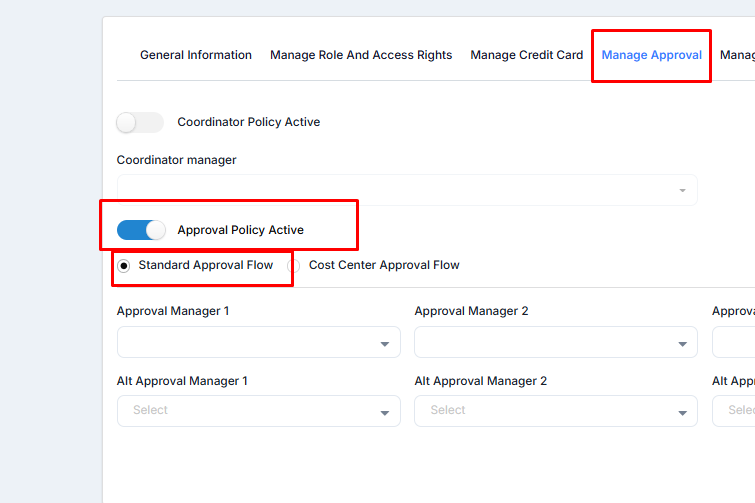
Image no.3 Approval Policy Active Option Location
Now that you have enabled the approval policy for the employee, proceed with selecting the approval managers.
"Approval manager" is a multi-select list, so the employee can have multiple approvers. The multi-select list contains all approvers that exist in the travel group. If there are no employees with the role "Approver," the list will be empty.
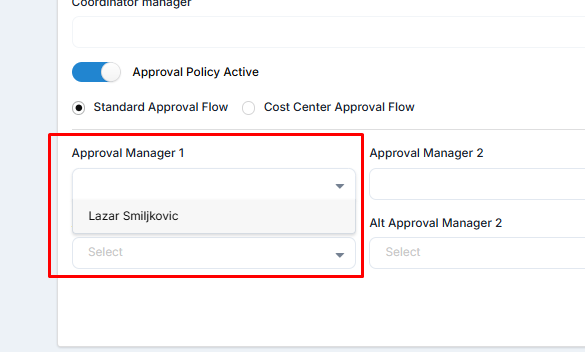
Image no.4 Example of a List of Available Approvers
While setting the multiple standard approvers for one level of approval flow is possible, the standard approval flow will only allow you to specify one Alternative approver for one level of approval:
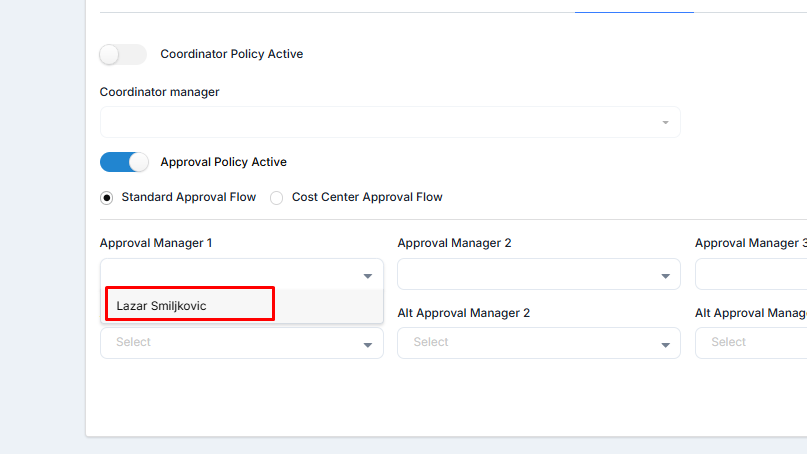
Image no.5 Example of a List of Available Approvers
If the approval flow is enabled, at least one approver on the first level must be set. An employee can have multiple approvers on each level. If the employee has multiple approvers, they select one of the first-level approvers during the shopping cart process, before the booking is done.
We will proceed with our example to set up a profile that has 2 standard approval managers on Level 1, one alternative approver manager for the "Alt Approver Manager 1" level as well as one standard approval manager for Level 2:
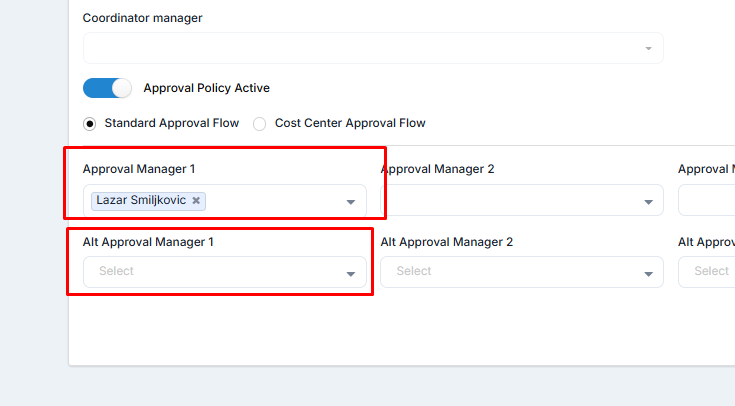
Image no.6 Standard Approval Flow Approval Managers and Alternative Approval Managers Being Set
The approver of the first level will see the bookings of all employees for whom they are approver when they log in. When they approve the booking, they select the approver of the second level, if there is more than one, and so on.
The approver of the second level will see the booking when the approver of the first level approves it. If the approver of the first level declines the booking, the approver of the second level won't have the booking in their list of bookings.
The booking will remain in a pending status until the approver of the last level (according to the settings) approves it, then the booking changes its status to approved. The same logic will be applied if all four levels are set. As advised previously, every approver manager can have one alternative approval manager.
Additionally, the employee can have a Standard or Cost Center Approval Flow:
 Image no.7 Cost Centre Approval Flow Option Example
The cost center approval flow works the same way; it is just related to cost centers created in the "Create cost center" wizard.
The administrator can add as many cost centers as they want, and the employee will select one during the shopping cart process.
Approval Managers Workflow
The travelers profile from above with the setup of having two main approvers and one alternative approver will have the choice of selecting the approval manager for level one before requesting approval at the end of the booking flow:
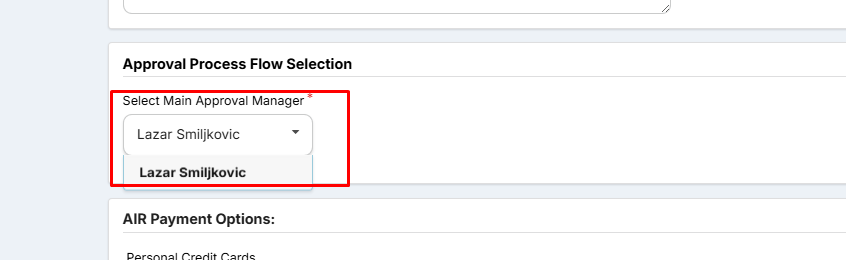
Image no.8 Selecting Level One Approval Manager Before Requesting Approval From a Travelers Perspective
After selecting the "Request Approval" button, the "on-hold" PNR has been generated with the message notification that informs you which approvers have received the request for approval, example below:
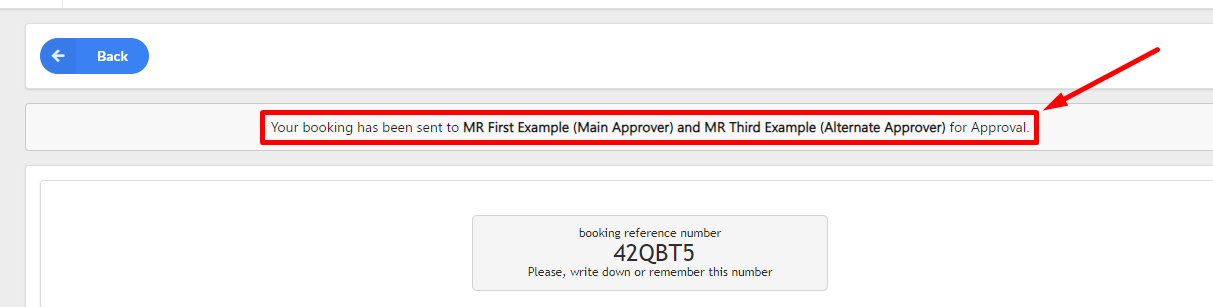
Image no.9 Approval Request Message Upon Booking Completion
In our example, the main approver we selected on the shopping cart as well as the alternative approver that is specified on the profile have been informed about the approval request.
The approvers that are pending the approval request will be informed via email titled "Approval needed for reservation...", management of this setting is possible over Air Travel Settings, Car Travel Settings and Hotel Travel Settings if you need the notifications to be enabled or disabled.

If you require changing the settings of the hours that are required for a notification to be sent and the number of repeats then the Travel Approval Settings need to be checked.
Now that the Approval Request is sent to the approver and alternative approver - the approver once logged in will first need to click on the "Manage Trip Approval" and the pending request will be presented as seen in the image below:

Image no.10 Main Approver Approval Request Message Upon Booking Completion
Since the approval request has been sent to both the main and alternative approver at once - the alternative approver once logged in will have the same view and the same decisions that can be made for the approval request. The view of alternative approver once logged in:
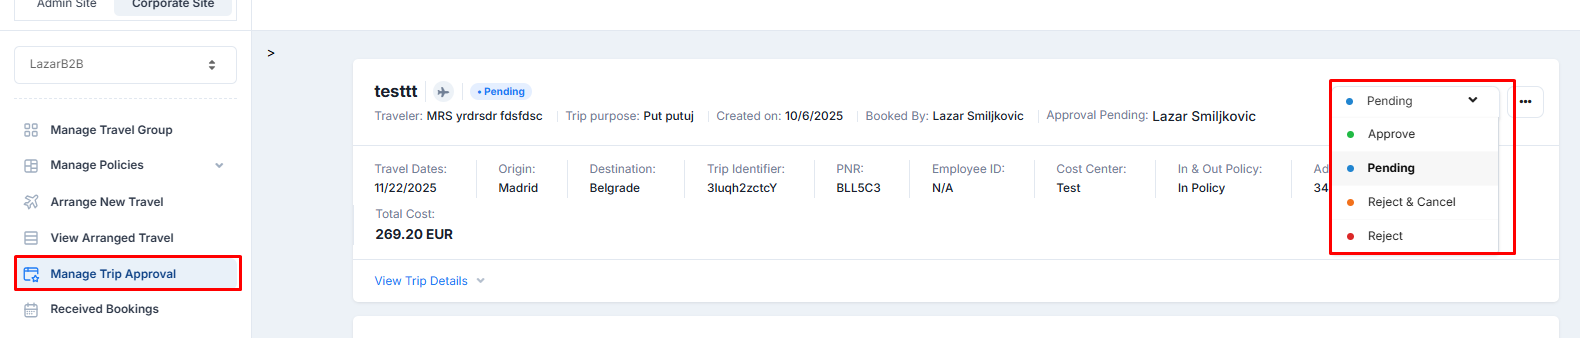
Image no.11 Alternative Approver Approval Request Message Upon Booking Completion
For each pending approval request for both main and alternative approver in the "Manage Trip Approval" tab, the bookings will allow you to choose between four approval statuses as seen in images.
Choosing "Approve" will confirm the approver's decision and put the approval request in "Confirmed" status if no other approval request levels are preset. If level two, three, and four approval is still pending, then the request for approval will be sent to the approvers that are set for the next level of approval.
Selecting the "Reject & Cancel" will cancel the "Held" booking request and put the created PNR in "Cancelled" status as well as a canceled queue. This decision can not be undone and will cancel any further approval requests for the pending approval.
Selecting "Reject" will put the Pending request in the "Rejected" status but the PNR will not be canceled. Here is an example of a view of rejected pending requests:
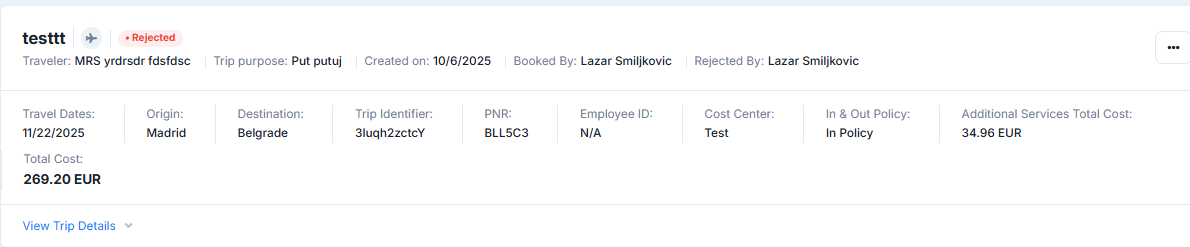
Image no.12 Rejected Approval Request
After selecting any status, a new window called "Approval Status Details" will pop up. The purpose of this window is for approvers to make a comment for their decision. Note that the remark will be inserted with the decision that is made for each approval.

Image no.13 Approval Status Detail
An example of a remark created with the "Reject" decision along with the name of the member of the travel group or administrator that made the approval decision:

Image no.14 Approval Decision Insert In Remark
At any time by first clicking on "View Trip Details" and then "History," you will be able to see the past activity of the approval request as seen in the example image below:
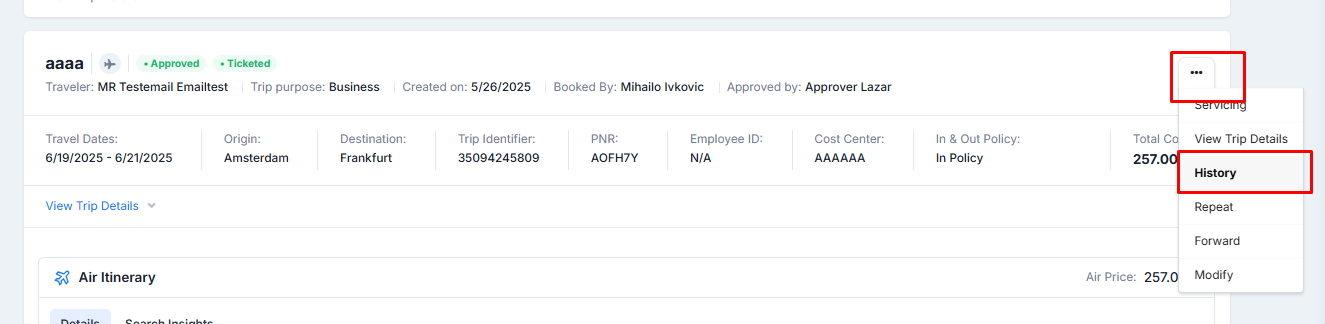
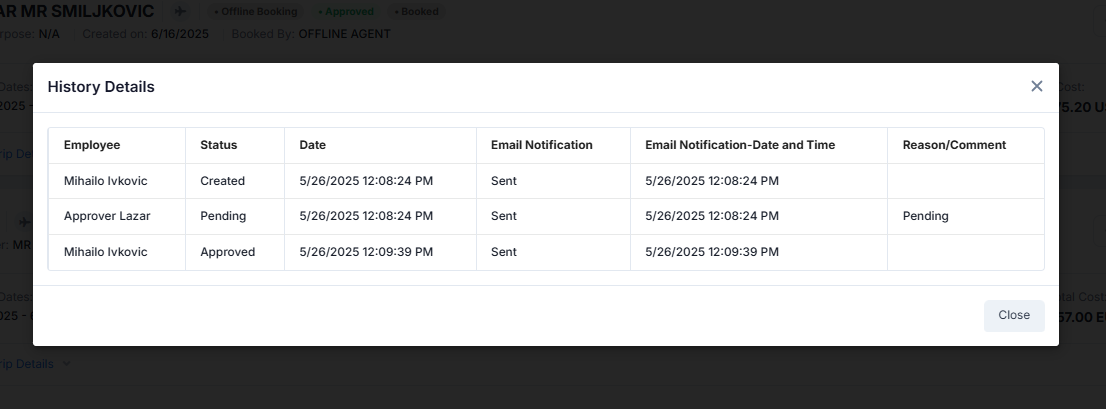
Image no.15 Approval Request Booking History
Now let's proceed with Approving this level of approval request and move on to the next level.
After the "Approve" Approval Status is selected and the "Submit" button is selected the system will refresh the "Manage Trip Approval" view and change the "Approval Pending" parameter to approval manager that is set for the next level, an example below:

Image no.16 Approval Pending Manager Updated Example
Once the next level approver logs in and selects the "Manage Trip Approval" tab the same display will be presented.
Since this booking had two levels of approval, once the second level approver selects the "Approve" approval status and clicks on the "Submit" button the approval request finally becomes "Approved" as seen in the example below:
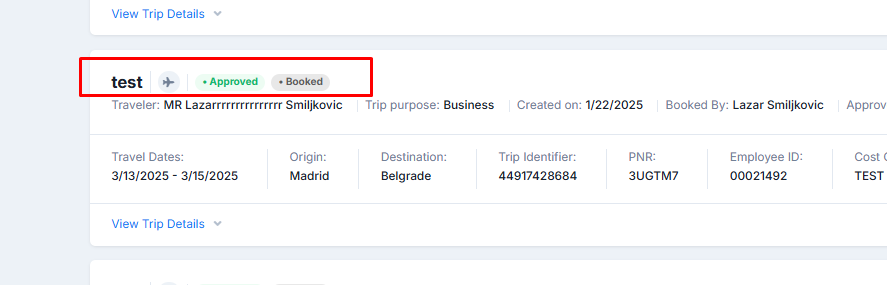
Image no.17 Approval Pending Request Getting Approved
During the whole approval process, the approval managers will receive the email notification informing them of the approval process. At the end of the approval process approvers will also receive a booking confirmation notification.
Selecting the "View Trip Details" below any approval request will present to the approval manager all information regarding the booking request in question. The example, created for the booking we used in this example can be seen below:
Image no.18 View Trip Details Of Approved Booking Example