TABLE OF CONTENTS
Introduction
This article covers the instructions on how you can perform a bulk upload of employees for one or more travel groups at once.
This process is performed by downloading and populating a .csv Excel file.
Only Website Administrators and Travel Group Administrators can perform bulk employee uploads.
Pathway to locate the functionality:
Corporate Site → Edit Travel Group → Upload Employee File → Select Appropriate Template File
 Image no.1 Upload Employee File Location
Understanding The Construction Of Employee Upload File
Before we get into instructions on how to populate the document used for file upload, let's define and clarify the construction and neccesery details of each employee profile.
Knowning how the profiles are constructed, what are mandatory fields and how they are arranged will greatly help you in understanding how the .CSV employee file needs to be populated.
The "List Employees" where all the profiles are located, presents the same location where all the profiles can be edited, or deleted.
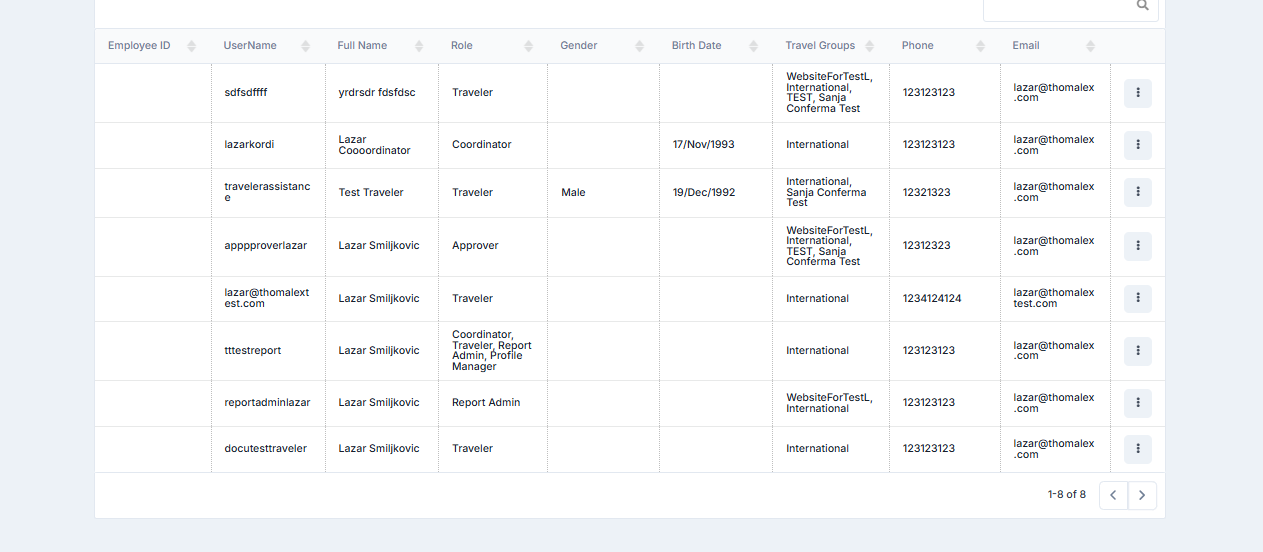
Image no.2 Typical Travel Group In Thomalex B2B Environment
Once you edit any of the already-created employee profiles, you will be presented with all available fields that an employee profile can have, regardless of its role.
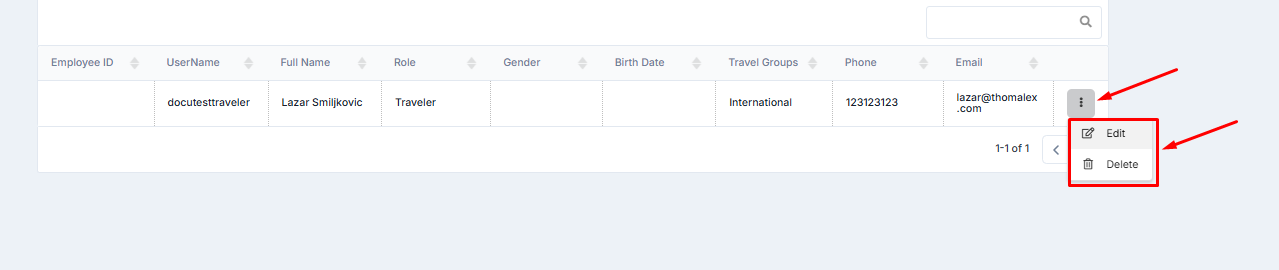
Image no.2 Edit Employee Profile Button Location
To better understand all specifics regarding creation of a single corporate emomployee, please refer to the following link - Create a Corporate Employee
Below lies the first part of the "General Information" tab of a typical employee profile with populated profile information that we just edited:
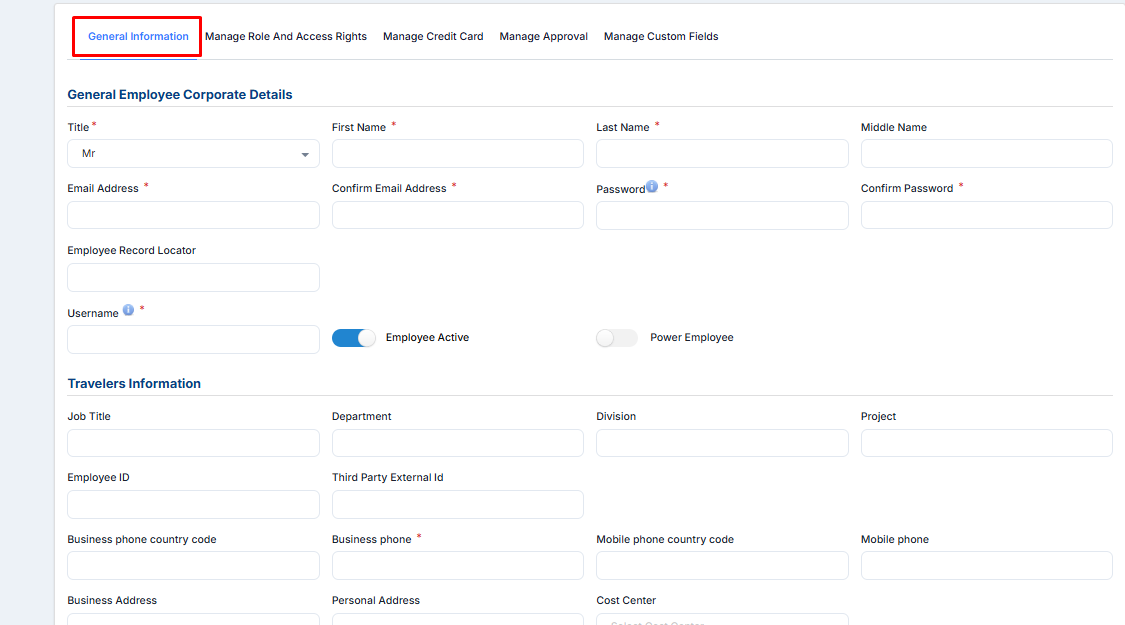
Image no.3 Edited Employee Profile General Information Tab Part No.1
The second part of the "General Information" tab of the same employee:
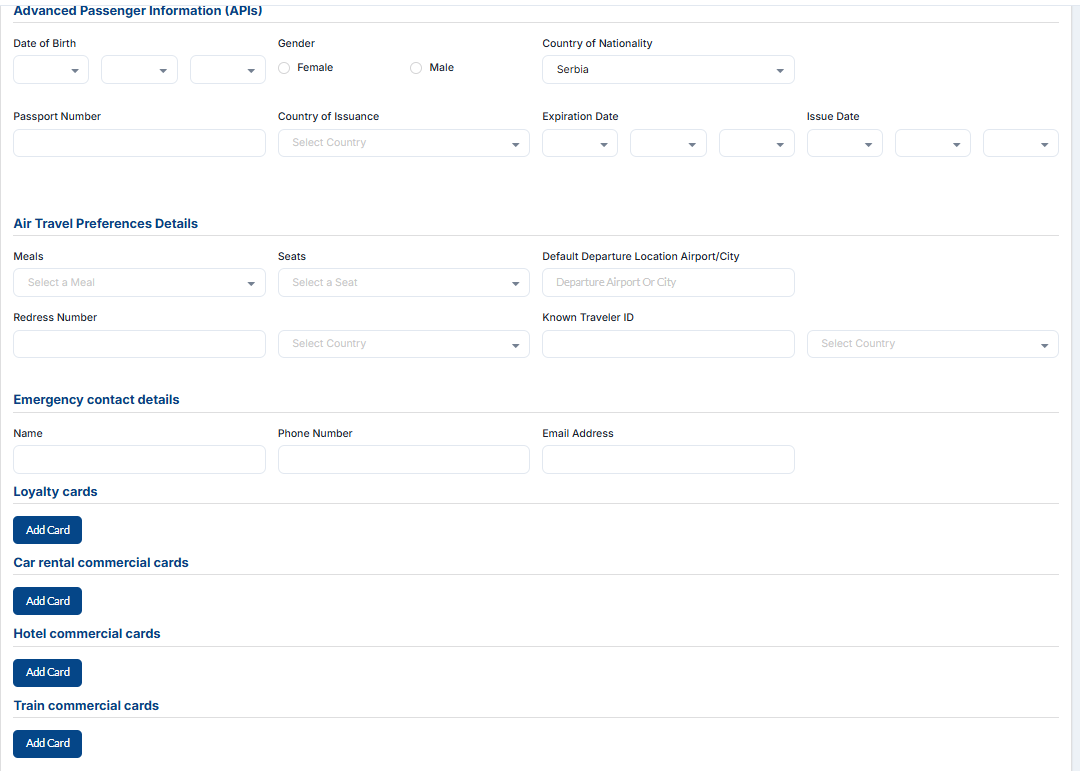
Image no.4 Edited Employee Profile General Information Tab Part No.2
Make sure that the "Manage Role And Access Rights" tab is also understood and that there are three distinctive attributes for each profile: (Employees Role, Associated Travel Group, as well as Default Travel Group)

Image no.5 Manage Role And Access Rights of Employee Profile Example
Furthermore, "Manage Approval" as well as "Manage Custom Fields" also present the two tabs of each corporate employee profile that are not neccesery to be populated for each setup but are important to be acknowledged and can be used as a reference when doing a bulk file upload.
These two tabs, "Manage Approval" and "Manage Custom Fields" will be visible on every profile only after its created. You are able to first create an employee then edit its profile to populate these fields.

Image no.6 Manage Approval Tab Employee Profile Example
An example of the "Manage Custom Fields" tab of a corporate employee profile can be seen below.

Image no.7 Manage Custom Fields Tab Employee Profile Example
For better understanding of Custom Fields, how they are used and managed, please refer to the documentation page - Custom Field Builder
Now that we have a better understanding of what fields make up a corporate employee profile, let's take a step back and download the existing corporate profiles from the examples above to see how the information will be reflected in the .csv file.
First, click on "List Employees" on the left panel then proceed on selecting "Download CSV Employee File", the steps are illustrated in the image below:

Image no.8 Download CSV Employee File Button Location
Once you open the downloaded file, you will be presented with the information within the CSV file that was previously populated in each employee profile:

Image no.9 Downloaded CSV Employee File Part No.1

Image no.10 Downloaded CSV Employee File Part No.2

Image no.11 Downloaded CSV Employee File Part No.3

Image no.12 Downloaded CSV Employee File Part No.4

Image no.13 Downloaded CSV Employee File Part No.5
Images numbered from no.8 to no.12 present all profile information of each employee of one travel group that is populated in the downloaded CSV file.
Images no.3 and no.4 display all corporate employee profile information that can be populated within a single profile.
Note - Images no.3 and no.4 display all corporate employee profile information that can be populated within a single profile.

Only fields that have the red (*) asterisk sign are mandatory when creating a single employee profile.

The same fields will also be considered mandatory when doing a bulk employee upload.
Upload Employee File
Now that we made clear what an employee profile consists of and what the typical employee upload file looks like, let's proceed with doing a batch employee profile upload.
To access the option to batch upload employee files, first click on "List Employees" and then the "Upload Employee File" tab of the travel group you are managing.
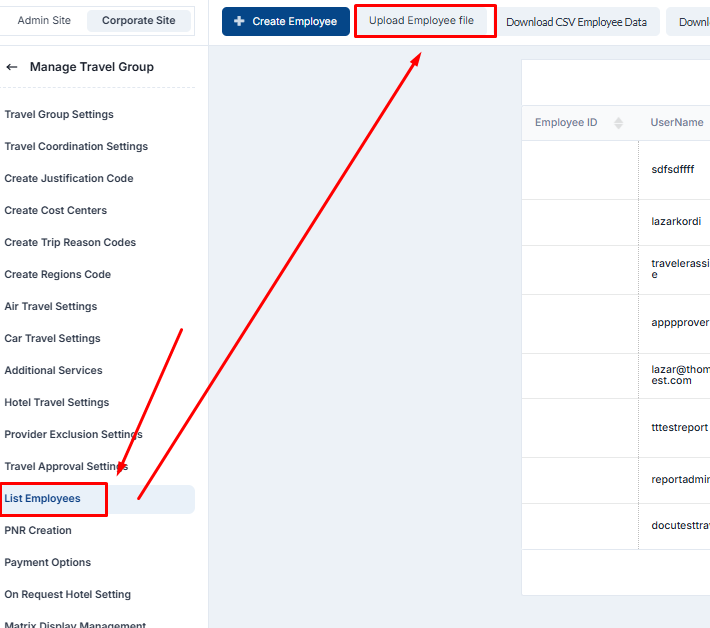
Image no.14 Upload Employee File Button Location
Once you select the "Upload Employee File" tab, the four options will be presented:
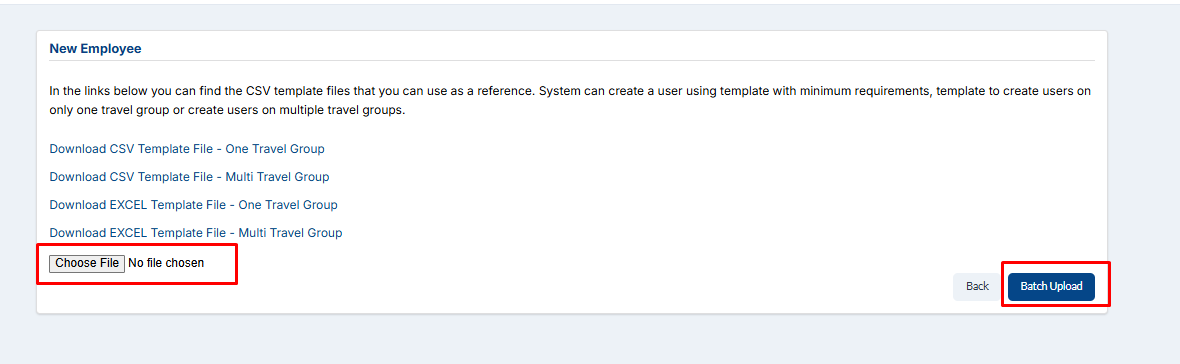
Image no.15 Upload Employee File Button Location
| Setting Name | Description |
| Download CSV Template File - One Travel Group | Downloads a .csv template that has fields required to upload profiles for a single travel group. |
| Download CSV Template File - Multi Travel Group | Downloads a .csv template that has fields required to upload profiles for multiple travel groups. |
| Download EXCEL Template File - One Travel Group | Downloads a .xlsx template that has fields required to upload profiles for a single travel group. |
Download EXCEL Template File - Multi Travel Group | Downloads a .xlsx template that has fields required to upload profiles for multiple travel groups. |
Downloading a CSV or EXCEL file will present no difference except for the format of the file itself.
Downloading a template for "One Travel Group" or "Multi Travel Group" presents no differences in the two files up until you reach the "AQ" column (Default_TravelGroup) of both files.
CSV Template for a One Travel Group:

Image no.16 CSV Template Single Travel Group Example
CSV Template for Multi Travel Group:

Image no.17 CSV Template Multi Travel Group Example
Notice how the template for a single travel group has the reference for a "TravelGroup" column to be a simple reference "TravelGroup" while the multi-group template has the reference "FirstTravelGroup".
The Collumn "AQ" (Default_TravelGroup) needs to be specified with the actual name of the travel group. For multi-group template the collumns "AQ" (Default_TravelGroup) and collumn "BJ" (TravelGroup2) need to be specified with the actual names of the travel groups.Image no.18 Example of Actual Names of Travel Groups
The obvious reason behind this is that the multi-group template will require/allow you to specify for each employee what is the order of travel group you are assigning the new employee to or in other words, what would be the first, second, or third travel group that you are assigning the new employee to.
As you can see from a downloaded template, all columns will already be prefilled with the information. The data that is already found in the downloaded template has the purpose of showing the customer how the fields need to be populated and in which format.
Notice how the roles are already populated in upper case letters. Please note that this needs to be the way of specifying the roles. The correct way of specifying roles in every employee upload template is listed below:
| Role Name | Correct Way To Input Field In Template |
| Travel Group Administrator | TRAVELGROUPADMIN |
| Profile Manager | PROFILEMANAGER |
| Report Admin | REPORTADMIN |
| Travel Coordinator | COORDINATOR |
| Approver | APPROVER |
| Alternative Approver | ALTAPPROVER |
| Traveler | TRAVELLER |
Now that the correct way of inputting information in the template is clear, let's upload one multi-travel group template and see the whole process until the system informs us that the upload is successful.

Image no.19 CSV Template Multi Travel Group Example With Populated Data Part 1.
The template in the first view has populated references for First Name, Middle Name, Last Name, Email, Desired Username, Password as well as the Job Title information and Business Address and Phone.
Note - Usernames need to be unique and Passwords need to have at least one upper-case latter, one number and one special sign. The second part of the template as we scroll to the right and come to the column "P" will have phone and personal address references input:

Image no.20 CSV Template Multi Travel Group Example With Populated Data Part 2.
The third part of the template will start from the "AQ" column (Default_TravelGroup) where we will specify the arrangement of travel groups and start defining Roles:

Image no.20 CSV Template Multi Travel Group Example With Populated Data Part 3.
The fourth part of the template will go from the "BB" column up until the "BJ" collum and will still have role references:

Image no.21 CSV Template Multi Travel Group Example With Populated Data Part 4.
The "BJ" collum (TravelGroup2), as previously explained, needs to have the reference for the order of travel group for the employees you are uploading. Up until the last column we will keep all roles as already set:

Image no.22 CSV Template Multi Travel Group Example With Populated Data Part 5.
Important note - The collumn "TravelGroup1_UserRole1" presents the primary role of any employee. You are free to create more similar collumns such as "TravelGroup1_UserRole2" or "TravelGroup1_UserRole2" and so on if you want to specify additional roles and travel groups that might otherwise not be predefined in the temaplte.
Now that all data is set. Let's save the file and proceed with uploading it.
Following the pathway:
Corporate Site → List Employees → Upload Employee File → Click on the "Choose File" to upload it from your directory:

Image no.23 Employee File Upload Chose File Button Location
After clicking "Batch Upload" the system will start uploading the selected file.
If the system encountered any errors they will be displayed in red and the appropriate description of an error will be indicated next to the attribute that is incorrectly input, for example:
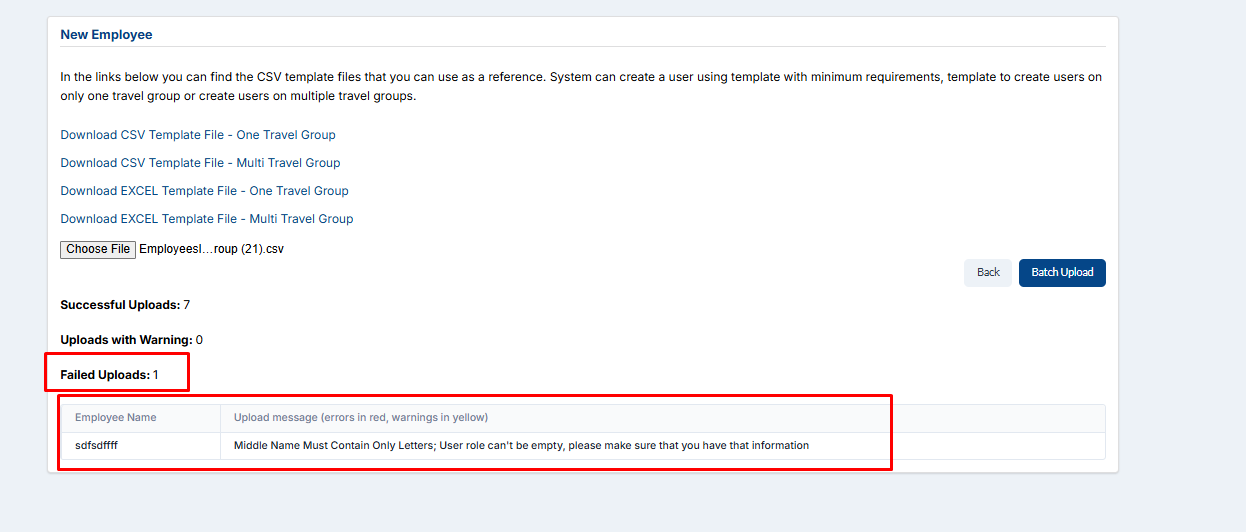
Image no.24 Employee File Upload Errors Example
As a final result, you can go back to the "List Employees" and check the successfully uploaded employees. Here is an example of successfully uploaded employees from this article:

Image no.25 Successfully Uploaded Employees