TABLE OF CONTENTS
Introduction
The purpose of this article is to get you familiar with creating car markups.
Setup
In order to access Markups builder use the following path:
Admin panel → Markups

Image 1. Markup builder location
When the markup builder is opened, select Car. Unlike the Air markups, for Cars, you only can create a service fee and promotional discount.

Image 2. Creating Car Markups
If you want to access existing Markups use the following path:
Admin panel → Markups
 Image 3. Manage markup location
Now you will be able to see the markup that has already been created. By clicking on the little blue box on the right side you will have three options, to edit markup, to clone (copy) it, and to delete it.
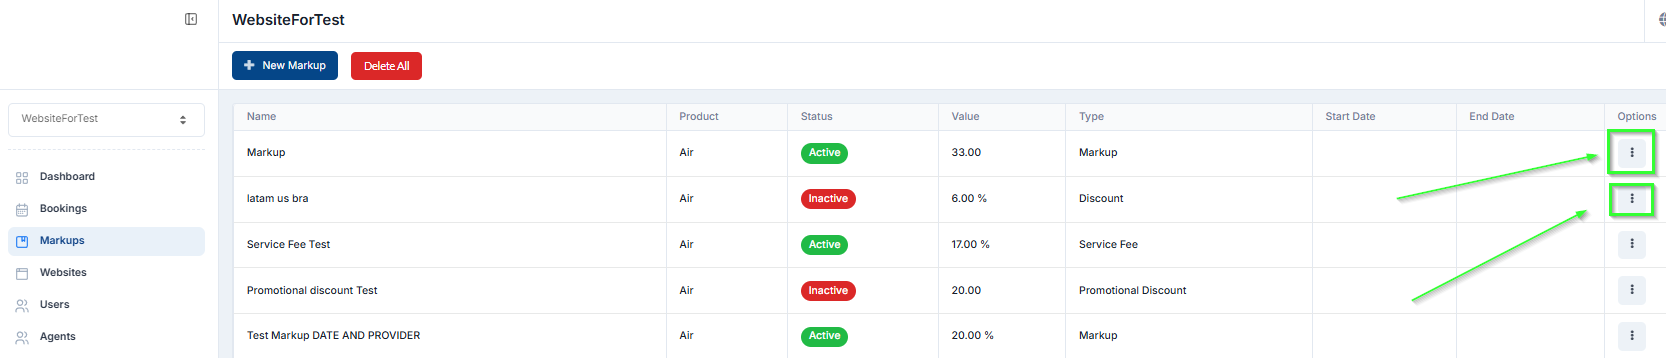
Image 4. Markup Options
Let's now focus on creating new Car markup.
Unlike Air Markups, Car Markups do not have such a large specter of options. We will go through all settings and explain each of them.
Car markup details
Here you will set the settings of the Markups. The mandatory fields for creating markup are only under this section and they are marked with red *.
In the table below you can find each setting and description for it:
Settings name | Description |
| Name | You can specify the name of the markup. This is a mandatory field. |
| Display option | If this option is enabled the clients will be able to see the markup amount in the shopping cart. If this option is not enabled then clients will not see the markup amount in the shopping cart, and the markup amount will be added to the base price. |
| Display Name | The name of the markup will be shown in the shopping cart. |
| Active indicator | By checking this option, your service fee will be active. If it is not checked your service fee will not be active. Basically, it is like the turn-on/off option. |
| Daily Service Fee | If this option is checked, the service fee will be applied per day. For example, if the car is rented for 5 days, the service fee will be applied 5 times. |
| Country | You can specify the country to which this service fee will be applied. You can select it from the drop-down list. |
| City | You can be even more specific, so you can specify the city to which the service fee will be applied. In case when you select the country, in the drop-down list of cities you will get only cities from that country. |
| Car Vendors | You can specify for which Car Vendors service fee will be applied. |
| Service Fee | In this field, you will specify the amount of your service fee. If the box next to the percentage is checked that means, that the service fee will be calculated as a percentage, and whatever number you entered will be calculated as a percentage of the car price. If the box is not checked the service fee will be calculated as the exact amount. |
| Promotional Discount Code | If you enter a promotional discount code, the markup will behave as a promotional discount. If you leave this field empty the markup will be applied as a service fee. The discount can be calculated as an exact amount or percentage depending on that if the percentage box next to the Service fee is checked or not. |
| Remark Info Message | Here you can specify custom text, which will appear in the PNR as a remark when the markup is applied. |
| Region | If this option is checked you get a new section where you can add a region for this markup. You can create as many regions as you want and you just need to click on the "Add Region" button and the region will be added. The active region will be the one selected in the "Region name" list. |
| Pickup Range | You can specify a date range and if t the pickup date is during that date range the service fee will be applied. |
| Booking Range | You can specify a date range in which this service fee will be active. |
NOTE: All markups for which rules are met will be applied.
NOTE: The agency is responsible to check the settings of the markup. We highly recommend that you firstly test the markup and set that markup is visible in the shopping cart. After you check that markup works as expected, you can hide it by disable setting Display Option.
How to use it
Let's create one Car markup. We will see how it will apply in different scenarios.
EXAMPLE 1
We created one basic test Markup. The markup should apply for all car rental reservations and it should be displayed in the shopping cart. The markup amount is 50$.

Image 5. Basic Test Car Markup
When we perform a Car rental search and add a car to the shopping cart, under Price Details you can see that this Car markup is applied:

Image 6. Basic Markup in the Shopping Cart
EXAMPLE 2
Now we want to change the setup of the Markup. We want that markup to calculate as a percentage. We want 5% for each booking. What we will do is that we enable Service Fees as a percentage and set it as 5%:

Image 7. Percentage Service Fee
After we add a car to the shopping cart, we can see that the Service fee is applied. The percentage is calculated based on the Car rate:

Image 8. Percentage Service Fee in the Shopping Cart
EXAMPLE 3
If we want that our markup be a Promotional discount, we just need to enter the Promotional code in the setup and the markup will behave as a Promotional discount:

Image 9. Promotional Discount
After we add a car to the shopping cart, we can see that we have a field for entering the Promotional code. After we enter it and click on Apply Discount, the discount will be applied and it will appear in Price details.
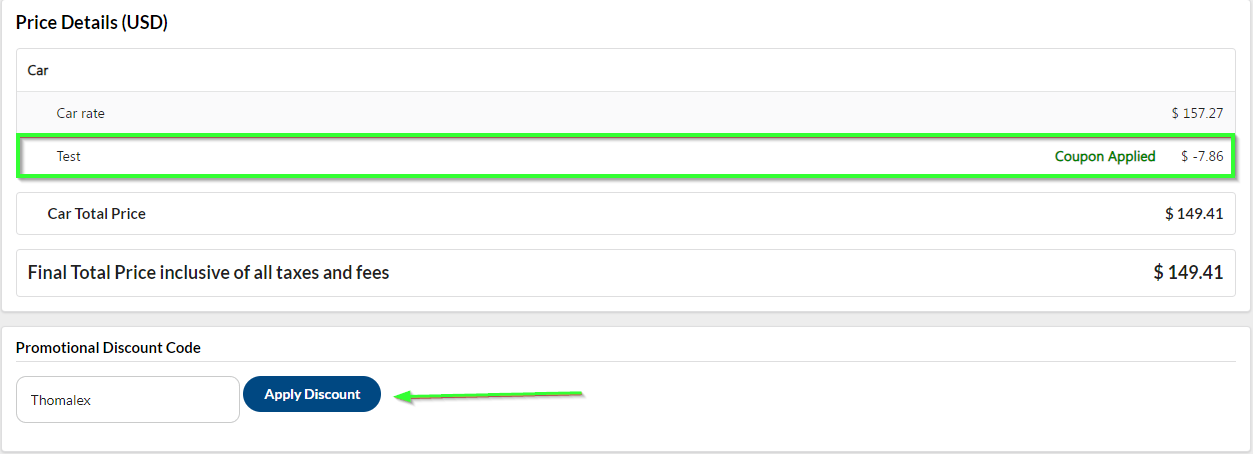
Image 10. Promotional Discount applied to the Shopping Cart
EXAMPLE 4
If we want to apply markup per day of car rental, we need to enable the Daily service fee option. We will set the markup amount as 20$:

Image 11. Daily Service Fee
If we want to rent a car for 3 days, in the shopping cart we will see that the markup is applied 3 times. The original amount is 20$ and now in the shopping cart markup is 60$ calculated 20$ per day:
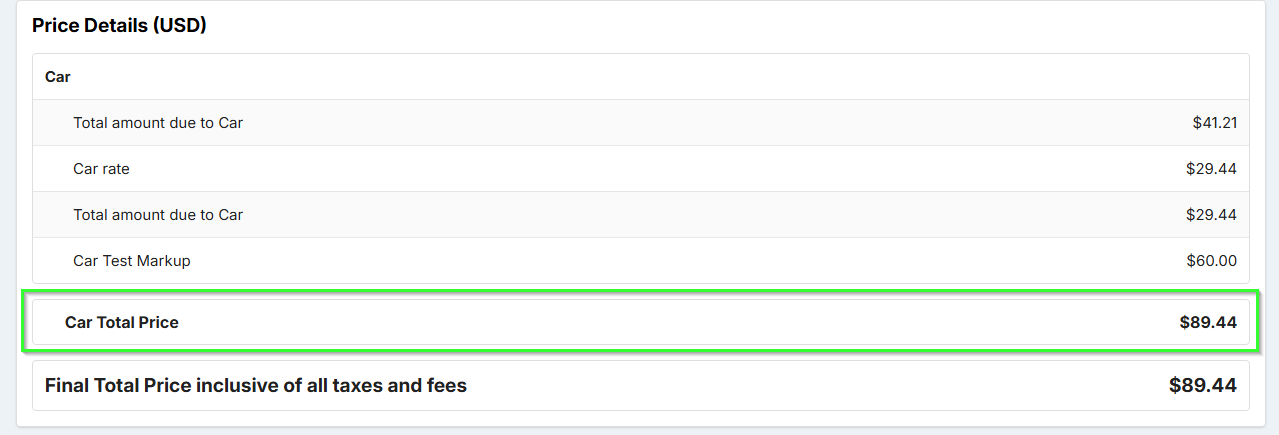
Image 12. Daily Service Fee in the Shopping Cart