TABLE OF CONTENTS
Introduction
The purpose of this article is to get you familiar with creating various types of Air Markups such as Markups, Service fees, and Discounts.
Setup
In order to access Markups builder use the following path:
Admin panel → Markups

Image 1. Markup builder location
Now you will see the Markup builder where you will create your Markup. The first thing you can see is that you can choose which kind of reservation you want to create the markup for. By default, it is set as Air.


Image 2. New Markup example
If you want to access existing Markups use the following path:
Admin panel → Markups
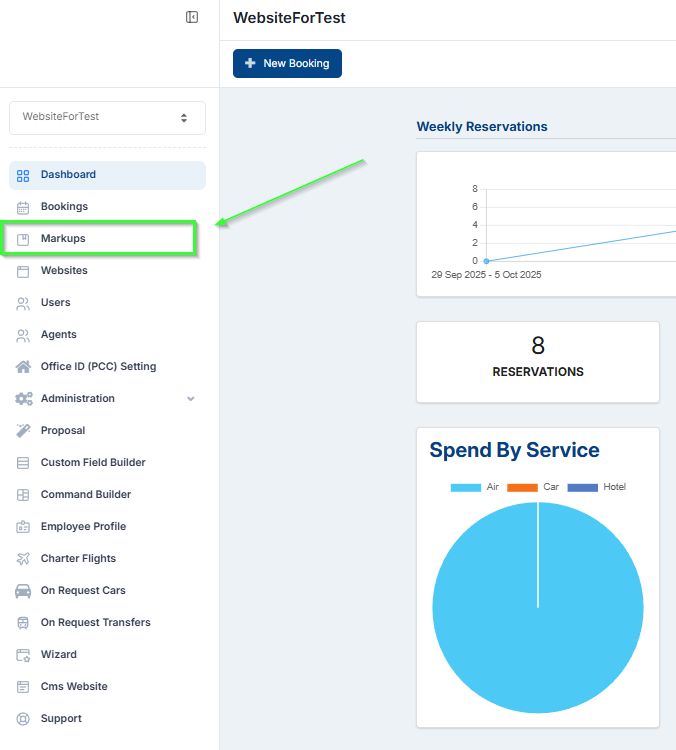
Image 3. Manage markup location
Now you will be able to see the markup that has already been created. By clicking on the little blue box on the right side you will have three options, to edit markup, to clone (copy) it, and to delete it.

Image 4. Markup Options
Let's now focus on creating new markups.
We can separate the Air Markup builder into 3 sections General markup details, Applicable rules, and Exclusion rules. Now we will explain each section and the settings in them.
General markup details
Here you will set the general settings of the Markups. The mandatory fields for creating markup are only under this section and they are marked with red *.
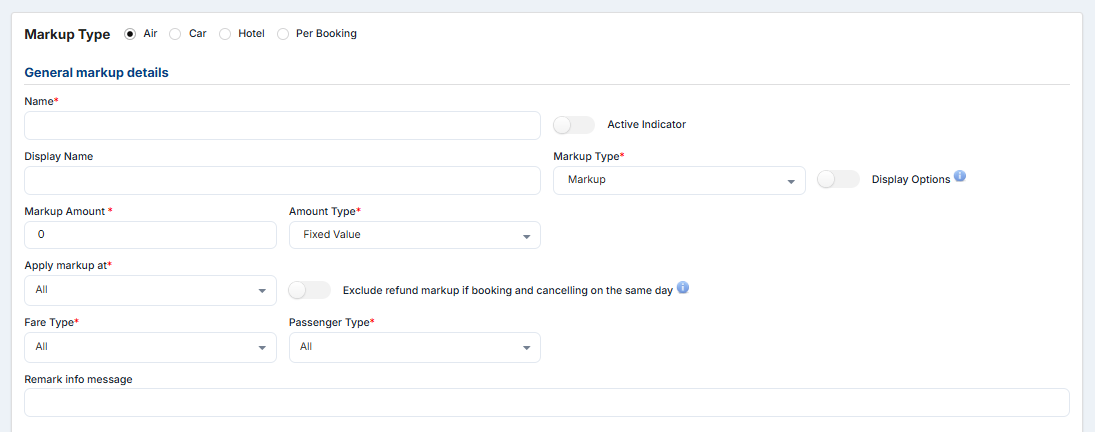
Image 5. General markup details
In the table below you can find each setting and description for it:
Settings name | Description |
Name | You can specify the name of the markup. This is a mandatory field. |
| Active indicator | By checking this option, your markup will be active. If it is not checked your markup will not be active. Basically, it is like the turn-on/off option. |
| Display option | If this option is enabled the clients will be able to see the markup amount in the shopping cart. If this option is not enabled then clients will not see the markup amount in the shopping cart, and the markup amount will be added to the base price of the flight. |
| Display Name | The name of the markup that will be shown in the Shopping Cart. |
| Markup Type | You can choose the markup type: Markup, Service fee, Discount, or Promotional Discount code. This setting is mandatory. Markup - is applicable per passenger on base fare Service fee - is applicable per PNR on the total price Discount - you can set the discount which will decrease the price of the flight Promotional discount - you can specify the promotional discount with the promotional code, which travelers will need to input in the shopping cart in order for the discount to apply. After you select the promotional discount, under the applicable rules you will find an additional field named Promotional discount code, where you will specify the discount code This setting is mandatory. If you do not specify the markup type, by default it will be set as Markup. |
| Markup Amount | You can specify the amount of the markup. This field is mandatory. If you do not specify, by default it will be 0. |
| Amount Type | You can select will the markup be a fixed value or percentage. This setting is mandatory. If you do not specify it, by default it will be set as a fixed value. |
| Apply markup at | You can select that markup can be applied in different situations such as booking, exchange, and refund. This setting is mandatory. If you do not specify it, by default it will be set as all. |
| Fare type | Agreed markup can be public, private, or corporate. This field is mandatory. If you do not specify it, by default it will be set for all fare types. |
| Passenger type | You can choose for which type of passenger this markup will be applicable. You can leave it as all, or you can select one or more than one. This field is mandatory. If you do not specify it, by default it will be set for all passengers type. |
| Payment type | This option will show up only if you select Service Fee as Markup Type. You can choose for which payment type this markup is applicable. You can choose the call me or credit card, or both of them. On B2C (leisure) websites a payment-specific service fee will be applied on the search result page if the default payment type matches the service fee's payment type. On B2B (corporate) websites payment types, specific service fees are applied upon selection of payment since in the shopping cart for B2B websites, we do not have a preselected payment type. Changing the payment type on the shopping cart should dynamically change the markups being applied. Visually, this will update the fare breakdown. |
Table 1. General markup details Settings and Description
Applicable rules
In this section of settings, you can set the applicable rules for the Markup. For example, you can set that markup to be applied per carrier, booking class, country, etc.
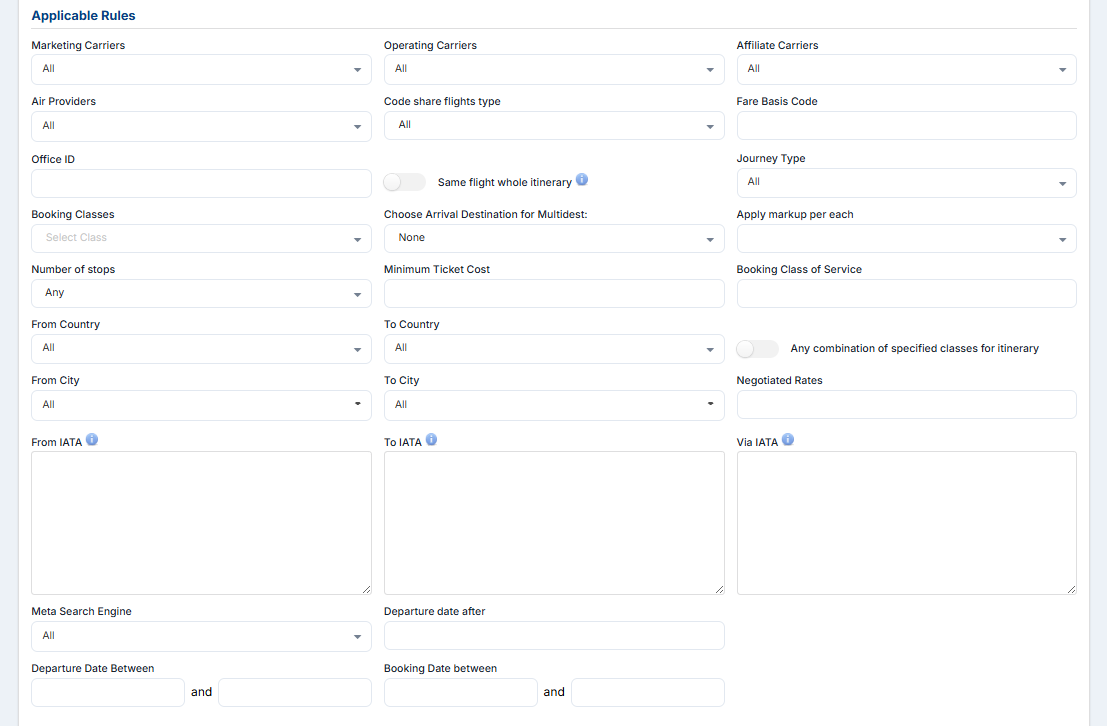
Image 6. Applicable Rules
In the following table, you can find all of the settings under this section and descriptions for them:
Settings name | Description |
| Marketing carriers | You can specify the marketing carrier for this markup. Markup will be applied on flights that have a marketing carrier specified in this field. |
| Operating carrier | You can specify operating carriers for this markup. Markup will be applied on flights that have operating carriers specified in this field. On the search, results page system will display the operating carrier if it is different from the marketing carrier. |
| Affiliate carriers | Affiliate carrier is the same as validating carrier. You can specify the affiliate carriers for this markup. Markup will be applied on flights that have an affiliate company specified in this field. |
| Air providers | You can select to which air provider this markup will be applied. |
| Code share flights | Here you can make a choice between 1. Equal marketing and operating carrier and 2. Different marketing and operating carriers. If the first option is selected the markup will be applied on all flights that have the same marketing and operating carrier (for example Marketing carrier: United Airlines; Operating carrier: United Airlines). If the second option is selected the markup will be applied on all flights that have different Marketing and Operating carrier (for example Marketing carrier: Air Serbia; Operating carrier: Air Berlin). |
| Base fares | Here you can insert the fare base code and the markup will be applied only on flights that have the specified code (for example fare basis code TE7NA0BN). Also, you can specify the fare family code, and the markup will be applied only to that fare family. ( for example, if the fare family code is at the end of the fare basis code QNNOAZB1 you will enter *B1, and if it is in the middle of the fare basis code SHX2SLE2 you will enter *SL*) You can specify the class of service to be applied only for specific fare family (for example if you want to apply markup only for the Q class and only for the fare basis code with B1 fare family, you will input Q*B1) If you want to input more than one fare basis code, or more than one fare family code divide them with a comma and no white space between. |
| Office ID | You can specify your office ID, so that markup will be applied to the search under that specific office ID. |
| Same flight whole itinerary | If this option is enabled this markup will be applied only if the same airline is on all flights in an itinerary. |
| Journey types | You can specify for which journey type this markup will be applicable (Oneway, Round trip, Multi-destination). |
| Booking Classes | You can specify for which booking classes this markup will be applicable. |
| Choose the arrival destination for multidestination | This functionality is for a multi-destination search. You can make a choice between 1. None 2. Use first destination as arrival destination 3. Use last destination as arrival destination |
| Apply markup to each leg | This option is related to a one-way combinable search. If this option is enabled then the markup will be applied on both flights and if it is disabled it will be applied only on the first. |
| Any combination of specified classes for itinerary | When you perform any roundtrip search, GDS does not return prices per leg. We only have the total price. As a result of that, we can not apply the markup on the specific leg, as we don't know how much money is for that leg. Depending on this setting the system will either apply markup if all legs have those classes of service or at least one of the legs. |
| Booking class of service | You can specify the class of service. If you input more than one, divide them with come and no whitespace. |
| Same class for the whole itinerary | If this option is enabled this markup will be applied only if the same classes are on all flights in an itinerary. |
| Any combination of specified classes for itinerary | This setting works with "Same class for the whole itinerary". If this is enabled and if we define the Booking class of service (for example A, C, Y, S, P, Q), then we get the flight that on the first leg has class A and on the second one class C, the markup will be applied. If this option is not enabled then the same classes must be on all legs in order to that this markup applied. |
| From Country | You can specify the origin (departure) country. |
| To Country | You can specify the destination country. |
| From City | You can specify the city for the selected origin country. In order to get the list of cities, first you need to select an origin country and save the Markup. Then go to edit the markup and then you will have the list of the cities. |
| To City | You can specify the city for the selected destination country. In order to get the list of cities, first you need to select a destination country and save the Markup. Then go to edit the markup and then you will have the list of the cities. |
| From IATA | You can specify the IATA code for the selected origin country. |
| To IATA | You can specify the IATA code for the selected destination country. |
| Metasearch engine | If you pick up the engine then the markup will be applied only to the bookings that are coming from the selected engine. |
| Departure date after | The markup will be applied only if the departure date is after (defined number) from the booking date. |
| Departure date between | Created markup can be applied just for departures in the specified time range. |
| Booking date between | Created markup can be applied just for bookings that were created in the specified time range. |
Table 2. Applicable rules Settings and Description
Now we will explain the setup for the option Choose the arrival destination for multidestination. As we explained in the table here you have three options to select:
1. None - if you use this option then markup will be applied on any multidestination search.
2. Use first destination as arrival destination - In the example below we will explain how markup will be applied if this option is selected:
MIA-RIO
RIO-ARG
ARG-MIA
The route that will be considered for applying the markup is MIA-RIO because RIO is the first destination. If you select this option the first arrival destination will be always considered.
3. Use last destination as arrival destination - In the examples below we will explain how markup will be applied if this option is selected:
Example 1:
MIA-RIO
RIO-ARG
ARG-MIA
The route that will be considered for applying the markup is RIO-ARG because ARG is the last destination. The last destination that will be considered for applying the markup must be different from the departure destination. And if the traveler is flying to a foreign country the last foreign country will be considered in applying the markup.
Example 2:
MIA-RIO
RIO-ARG
ARG-NYC
The route that will be considered for applying the markup is RIO-ARG because ARG is the last destination. The last destination that will be considered for applying the markup must be different from the departure destination and ARG is the last foreign country.
Example 3:
MIA-RIO
RIO-URU
URU-ARG
The route that will be considered for applying the markup is URU-ARG because ARG is the last destination and the last foreign country.
Example 4:
MIA-NYC
NYC-LAX
LAX-MIA
The route that will be considered for applying the markup is NYC-LAX because LAX is the last destination different from the departure destination and all flights are domestic.
Example 5:
MIA-NYC
NYC-LAX
LAX-DFW
The route that will be considered for applying the markup is LAX-DFW because DFW is the last destination and it is different from the departure destination and all flights are domestic.
Exclusion rules
By setting up this section you can set specific exclusion rules for the markup itself. Same as for applicable rules, here you can exclude this markup per carrier, booking class, country, city, etc.

Image 7. Exclusion rules
In the following table, you can find all of the settings under this section and descriptions for them:
| Setting name | Description |
| Exclude Marketing Carrier | You can exclude the marketing carrier for this markup. Markup will be applied on all flights where the airline that you set is not a marketing carrier. |
| Exclude Operating Carrier | You can exclude the operating carriers for this markup. Markup will be applied on all flights where the airline that you specified in this field is not an operating carrier. On the search, results page system will display the operating carrier if it is different from the marketing carrier. |
| Exclude Affiliate Carriers | Affiliate carrier is the same as validating carrier. You can exclude the affiliate carriers for this markup. Markup will be applied on all flights where the airline that you set in this field is not an affiliate carrier. |
| Exclude Booking Classes | You can specify the classes that you want to exclude. The markup will be applied to all classes, but the ones that you specified in this field. |
| Exclude Booking Class of Service | You can exclude the booking class of service. The markup will be applied for all classes of service, but the ones that you specified here. If you want to set more than one booking class, divide them with coma (,) and no whitespace between. |
| Exclude Base Fares | You can exclude fare basis codes and the markup will not be applied for flights with specified fare basis codes. Also, you can exclude the entire fare family and the markup will not be applied for that fare family (For example, if the fare family code is at the end of the fare basis code QNNOAZB1 you will enter *B1, and if it is in the middle of the fare basis code SHX2SLE2 you will enter *SL*). You can exclude the class of service for specific fare family (for example if you want to exclude markup only for the Q class and only for the fare basis code with B1 fare family, you will input Q*B1) |
| Exclude From Country | You can exclude the origin country and all flights from that country will be excluded from applying the markup. |
| Exclude To Country | You can exclude the destination country and all flights to that country will be excluded from applying the markup. |
| Exclude from City | You can exclude the city for the selected origin country and all flights from that city will be excluded from applying the markup. In order to get the list of cities, first you need to select an origin country and save the Markup. Then go to edit the markup and then you will have the list of the cities. |
| Exclude to City | You can exclude the city for the selected destination country and all flights to that city will be excluded from applying the markup. In order to get the list of cities, first you need to select an origin country and save the Markup. Then go to edit the markup and then you will have the list of the cities. |
| Exclude from IATA | You can exclude the IATA code for the selected origin country and all flights from that IATA code will be excluded from applying the markup. |
| Exclude to IATA | You can exclude the IATA code for the selected destination country and all flights to that IATA code will be excluded from applying the markup. |
Table 3. Exclusion rules Settings and Description
Region
If this option is checked you get a new section where you can add a region for this markup.
NOTE: If you choose to apply markup to region the fieleds "From Country", "To Country", "Exclude from Country", and "Exclude to Country" will not be visible.
You can create as many regions as you want and you just need to click on the "Add Region" button and the region will be added.
The active region will be the one selected in the "Region name" list.
NOTE: Only one region can be active for one markup.
Setting made in General Markup Details, Applicable Rules, and Exclusion Rules will be applied to the selected region.
By clicking on Edit you can modify made Region.
When you are using flights that are not connected, in that case, you have to set in the destination all countries from Europe, that you set in origin + USA in both. You need to set the region like explained for flights that are not connected if you want this service fee to be applied. If flights are connected then it is enough USA in origin and all from Europe in the destination.
The example above is for the USA-Europe region.
INFO: You can create as many markup as you want. All created markups that are applied on the selected flight will have its own line on the shopping cart. If the markup, discount or promtoional discount is applied it will be dispalyed by name if displaying is enabled. If the service fee is applied it will be displayed as Service fee regardless how you name it in the General markup detals if displaying in the shopping cart is enabled.
NOTE: All markups for which rules are met will be applied.
NOTE: The agency is responsable to check the settings of the markup. We hihgly recomend that you firstly test the markup and set that markup is visible in the shopping cart. After you check that markup works as expected, you can hide it by disable setting Display Option.
How to use it
Now we will create one markup and see how it will apply to the shopping cart.
EXAMPLE 1
We created markup with settings that should apply only when American Airlines is a Marketing carrier. Also, we enable the display option so it will be visible in the shopping cart. The amount is 100$:
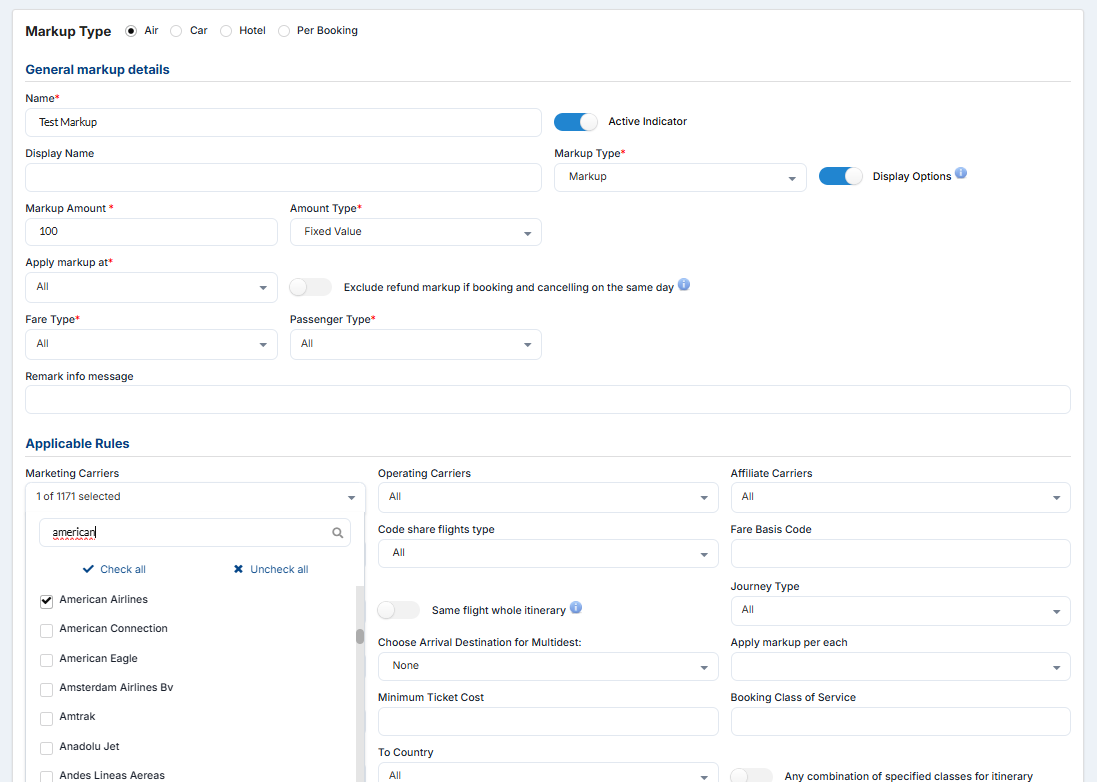
Image 8. Markup test 1
In the search result page, if you open the Fare Family for American Airlines, and if you hover over the price, you can see if the markup is applied or not. Also, that depending on that if the display option is enabled or not:

Image 9. Display applied Markup on the Search result page
After we add this flight to the shopping cart under the Price Details you will see the Markup by his name and the amount of it. That means that Markup is applied correctly:

Image 10. Display applied Markup in the Shopping cart
If we want to check if the applicable rules are applied correctly, that markup should be applied only for flights where American Airlines is the marketing carrier, we can select a United Airlines flight or the flight from some other airline. By hovering the price in the Fare Family display on the search result page, we already see that Markup is not applied:
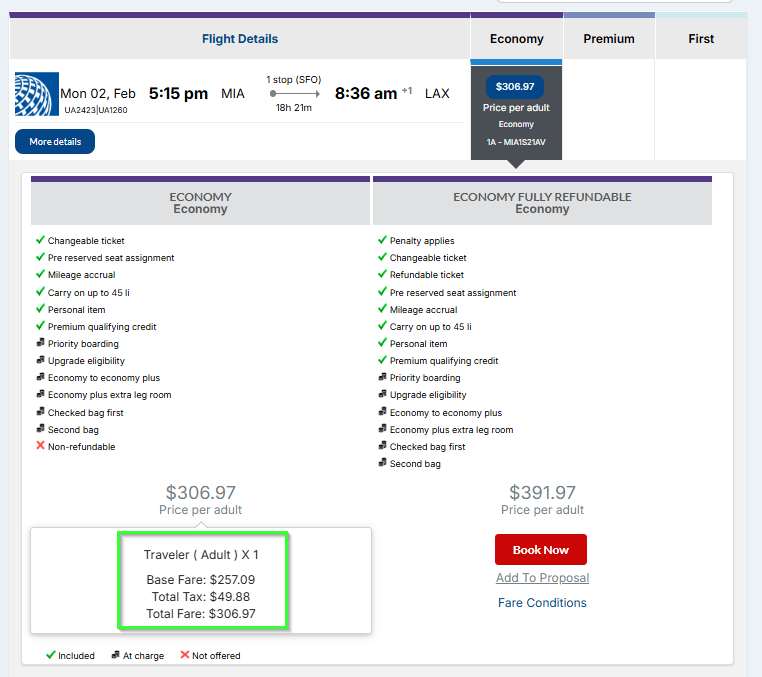
Image 11. Markup not applied
If we add this flight to the shopping cart we will see that the markup is not applied and that the applicable rule that we set works as expected.
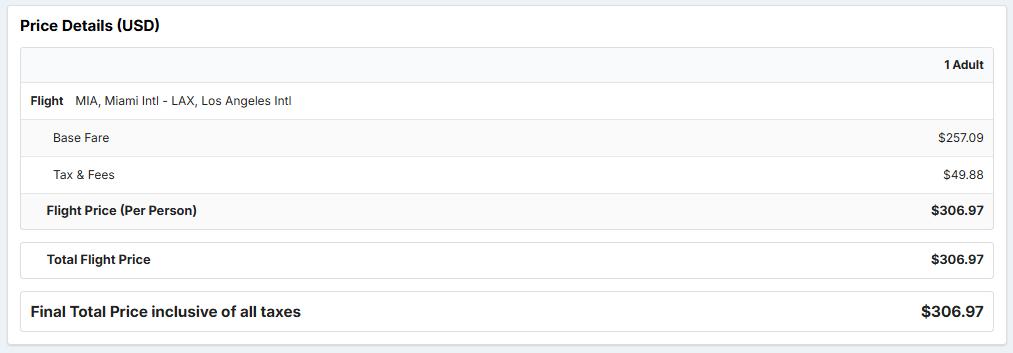
Image 12. Markup not applied
EXAMPLE 2
Let's say that agency wants to have a markup for domestic flights (USA) of 100$, but if the departure airport is Miami then the markup should be 150$.
In this case, two markups must be created.
The first markup will be for domestic flights. We will set that it will be applied for "From Country": USA and "To Country": USA.
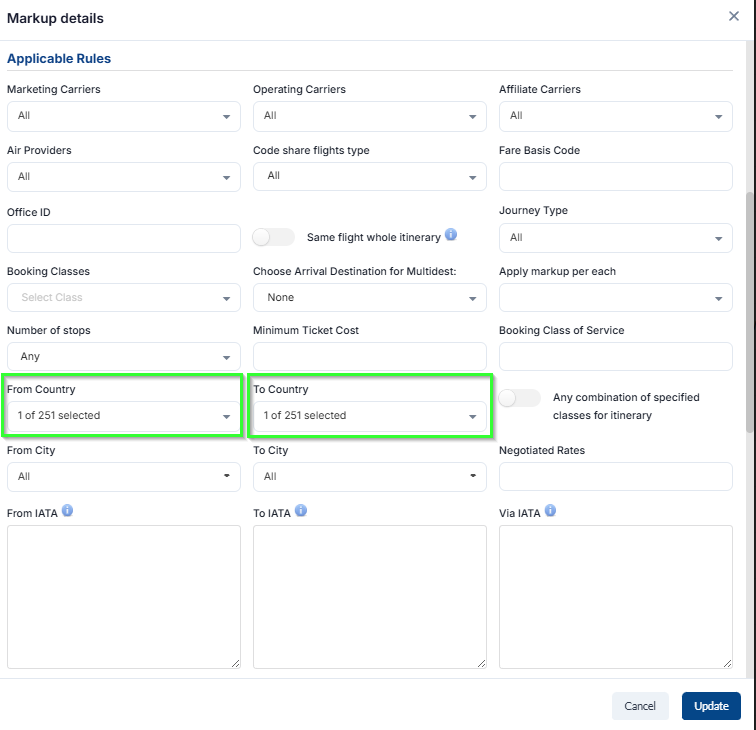
Image 13. Applicable Rules for Countries
But as we mentioned the agency will have a separate markup for Miami. What we want to do now is to apply markup for all flights that depart from cities in the USA except Miami. In order to get the list of the cities we need first to create this markup.
Now we find Exclusion rules. For From Country and To Country we select the USA, and for From City, we will select Miami.

Image 14. Exclusion Rules for "From Cities"
Now we click on save and we created our first Markup.
The second Markup should be applied only for flights that depart from Miami.
The procedure is the same as for the First Markup.
We will name it Departure from Miami and set the amount at 150$.
Under Applicable rules for "From Country" and "To Country" we will select the USA and for "From Cities" we will select Miami.
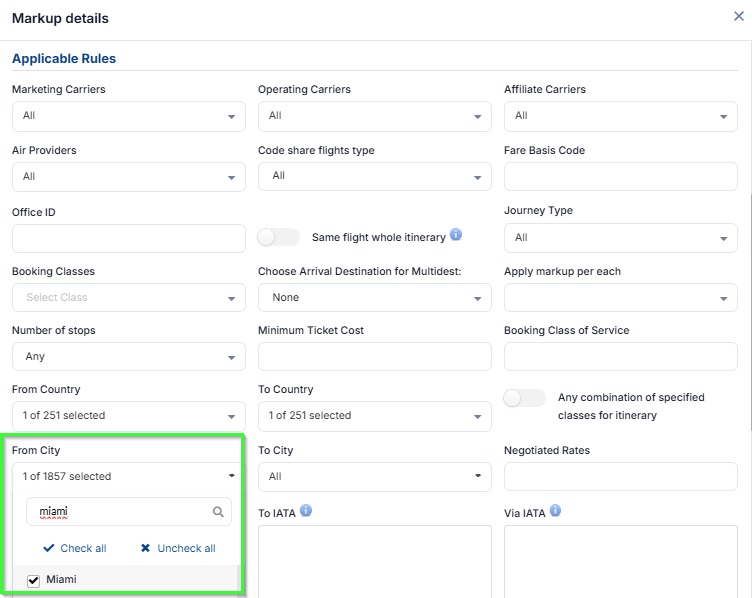
Image 15. Departure from Miami markup
After that we have done this we will click on the New Markup button and create this markup.
Now we want to see did our markup applied correctly.
First, we will test does Domestic Markup applied for all domestic flights except ones that depart from Miami.
We will perform a search for JFK-LAX. For this destination, the Domestic markup should apply. After we add some flights to the shopping cart, we will see that for this destination markup is applied:
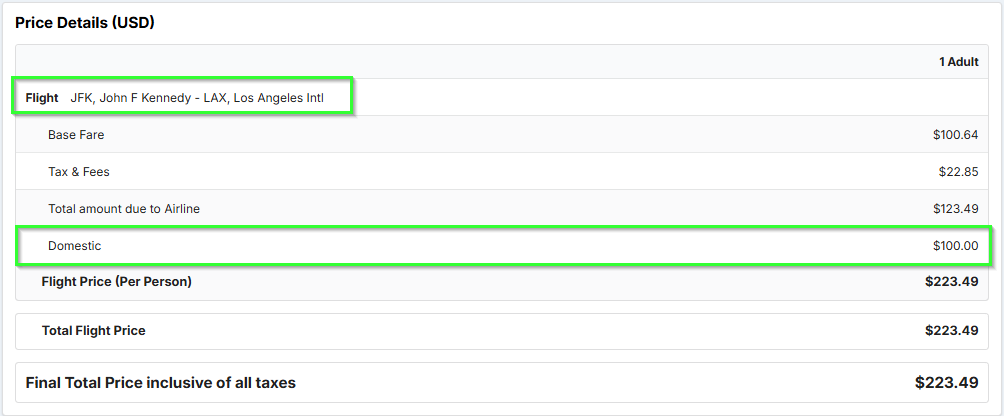
Image 16. Domestic markup applied
Now we want to be sure that the Domestic Markup will not apply to flights that depart from Miami. Instead of that the Departure from Miami markup should be applied.
We will perform a search MIA-LAX and after we add some of the flights to the shopping cart we will see that the correct markup, Departure from Miami, applied:

Image 17. Departure from Miami markup applied
FAQ
How to apply markup per passenger?
Solution: Markup will be applied per passenger if you set Markup Type as Markup. It will be applied to the base fare.
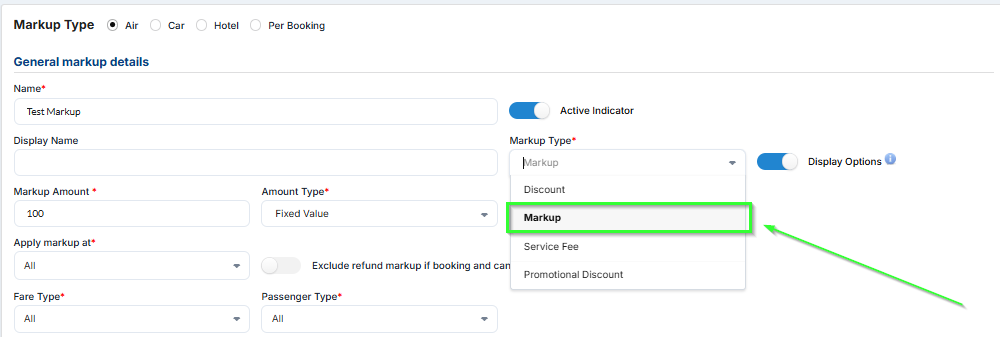
Image 18. Apply Markup per passenger
How to hide the markup amount from the shopping cart?
Solution: You can hide the markup amount in the shopping cart by not checking the Display option. The amount of the markup will be added to the base fare.

Image 19. Hide Markup in the Shopping Cart