TABLE OF CONTENTS
- Introduction
- Setup
- Display on Policy
- Types of Custom Fields
- How to setup custom fields to the command builder
Introduction
The purpose of this functionality is to create fields that are not predefined, and which will be displayed in the shopping cart or employee profile.
INFO: The administrator will be able to see this functionality in his heading and will be able to create their own fields that can be displayed on the profile or on the shopping cart.

Setup
To create a custom field use the following path:
1. Log in to the Thomalex platform,
2. Choose a website from the Site Selection Menu where you want to set up a custom field
3. From the admin panel click on the tab Custom Field Builder
4. Click on the button Add New Custom Field

Image 1: Custom Field Builder Location

Image 2: Add new Custom Field

Image 3. Custom Field Creation
In the pop-up of the Custom Field Creation, you will be able to create your own parameters for your new field. Here are explanations for each parameter:
| Type | You can select the format type of Your field (Free Text, List, Password, Pattern) |
| Associated Travel Groups | You can associate this custom field with a Travel Group(s). If you do not associate it with a specific travel group, the custom field will be associated with all travel groups by default. |
| Label | This is the name of your new field. |
| Default Value | Your field can have a default value. |
| Active | If this parameter is on, Your new field will be active. |
| Mandatory | If this parameter is on, Your field will be mandatory, not optional. |
| Read Only | Your field will be read-only. |
| Display on Profile | You can choose if your field will be displayed on the Profile. |
| Display on Email | Can be enabled only if "Display on the shopping cart is enabled", then all fields that are marked to be displayed on the shopping cart will be displayed on the e-mail, no matter if they have value or not. |
| Display on Reports | Can be enabled only if "Display on the shopping cart is enabled", then all fields that are marked to be displayed on the reports will be displayed on the reports, no matter if they have value or not. |
| Display on Shopping cart | You can choose if your field will be displayed on the Shopping Cart. |
| Create as Remark in PNR | You can choose do you want to be in the remarks of PNR |
| *Display on Policy | This option will be displayed only if the custom field is type and if display in the profile is enabled |
Description: Table 1
NOTE: You can enable Display on Shopping cart and Display on Profile at the same time.
NOTE:Display on Profile will be displayed in the travellers/employees profile, depens if the website is Leisure B2C or Corporate B2B.
Display on Policy
We have implemented a new parameter within the Custom Field - Display on Policy.
To enable this option, two conditions must be met:
1. Type must be List
2. Display on Profile must be enabled

Image 4. Display on Policy parameters
Once done, the Display on Policy option will be available. After you enable it, the custom field will be visible in the Policies settings:
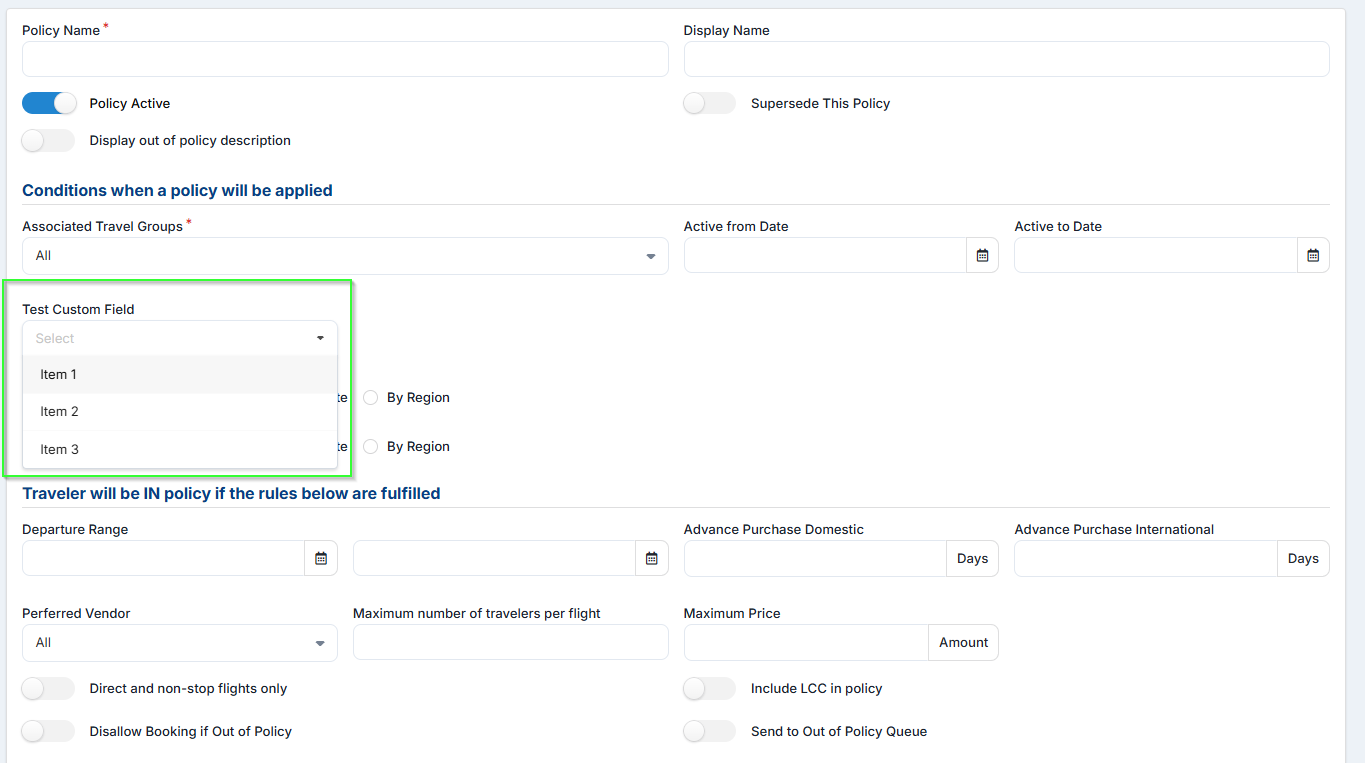 Image 5. Custom field displayed in Air Policy
How you can use custom fields in policies you can find in the next articles:
Types of Custom Fields
We have mentioned that you can select between these types: Free text, List, Password, Pattern, or File Upload, and you can now see how you can set it up:
NOTE:You can change any parameter on Edit button except parameter Type, once You define type you can't change it.
Free Text
If you select to create a custom field with free text, your traveler in the shopping cart will be able to put some free text in the field.

Image 6. Display of Type Free text
List
If you select to create a custom field with a type list, you will have the option to add items and enable if you want that your travelers have the possibility to select multi options from the list:
NOTE: Maximum number of list items is 100.

Image 7. Display of Type List
When you add items to the list, you can change their order by clicking on one item and pulling it to the bottom or the top:
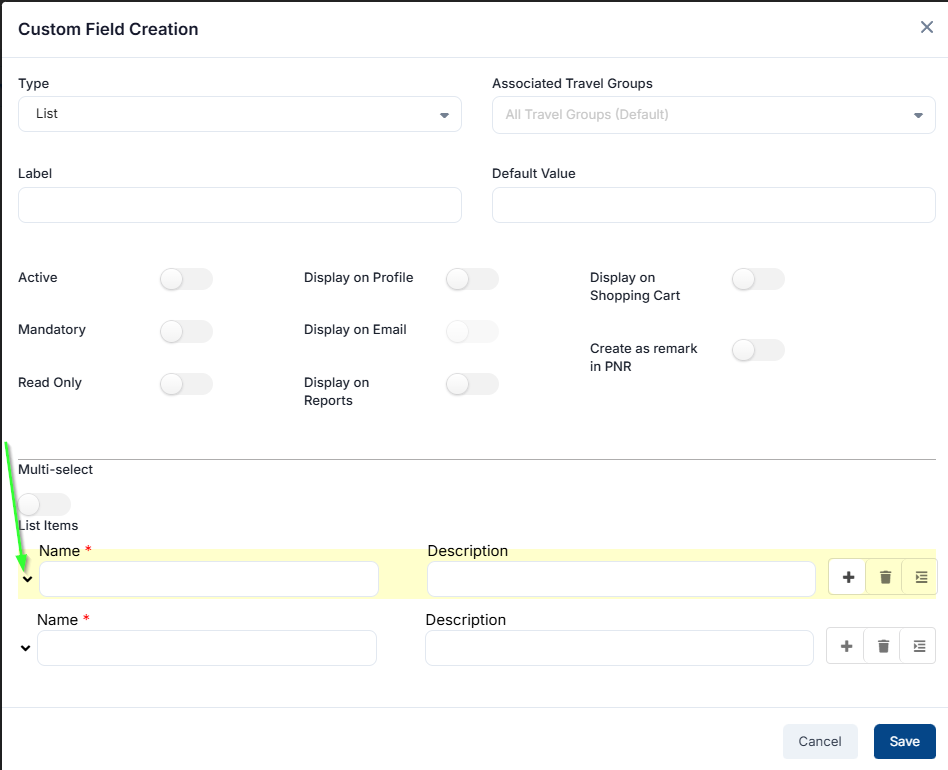
Image 8. Change the order in the list
A new option is to add the sub-item under the existing list item. All you need to do is to select the "Add Sub Item" icon.

Image 9. Add sub-item to the list
Password
If you create a custom field with the type of password, it will be displayed like dotes:

Image 10. Display of Type Password
Pattern
If you select to create a custom field with a Type pattern, you will have a couple of options, and in the table, you can read more about them:
| Minimum length | You can put the number of minimum lengths for your pattern |
| Maximum length | You can put the number of maximum lengths for your pattern |
| Alphabetic (A-Z, a-z) | You can enable it if you want that your pattern contains only alphabetic letter |
| Numeric (0-9) | You can enable it if you want that your pattern contains only numbers |
| Alphanumeric (A-Z, a-z, 0-9) | You can enable it if you want that your pattern contains an alphabetic letter in combination with numbers |
| Special (-/@,#*) | You can enable it if you want that your pattern contains special characters |
| Error message | You can put the text of what your pattern contains so that the traveler in the shopping cart knows how to fill it |
Description: Table 2

Image 11. Display of Type Pattern
File Upload
If you want to have a feature to upload the file from the shopping cart, you should create a custom field with the type File Upload.
NOTE: File with extension .PDF, .PNG, .GIF, .JPEG, .JPG can be upload to the reseravtion.
You can display File uploads in the shopping cart and on the reports.
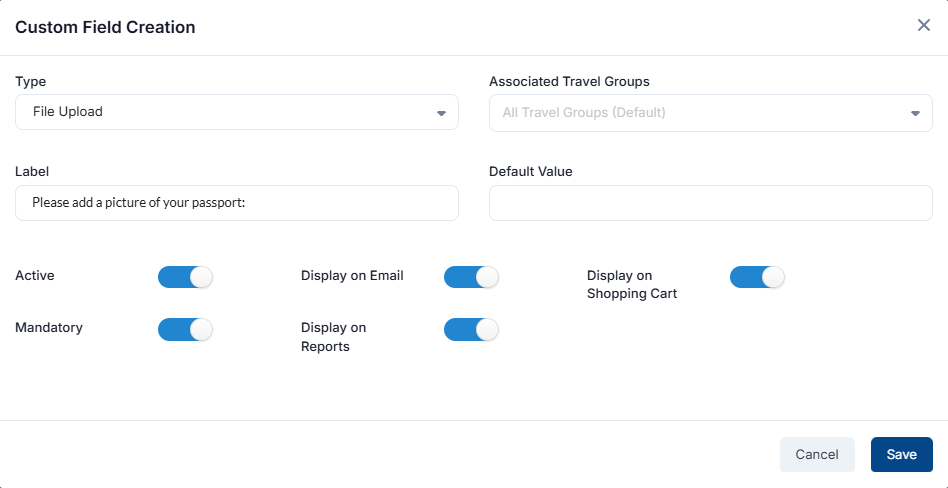
Image 12. Display of Type File Upload
Default Value
You can create Custom Field with some default value, in the picture below you can see how:
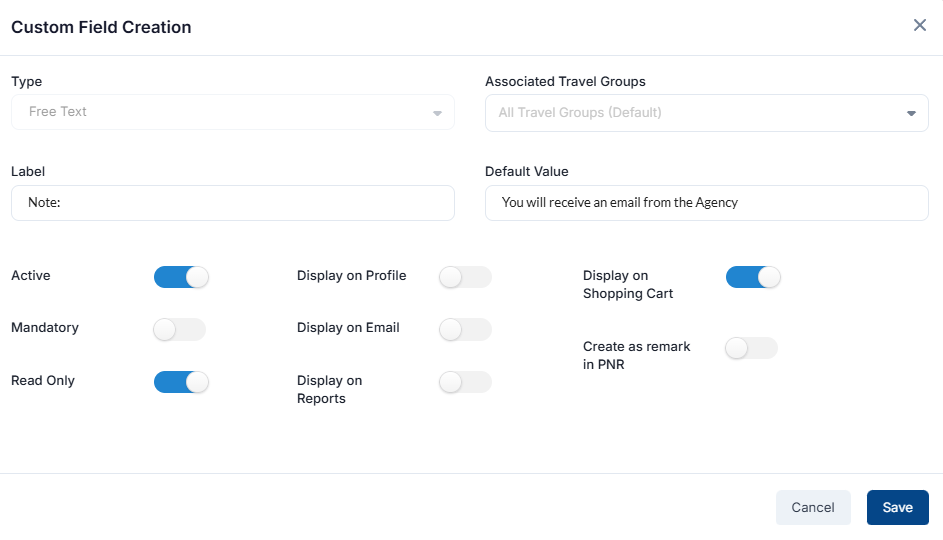
Image 13. Display Custom Field with Default Value
When you create your custom fields they will be displayed in the tab Custom Field Builder, and you will be able to see what is enabled and what isn't for each of them.
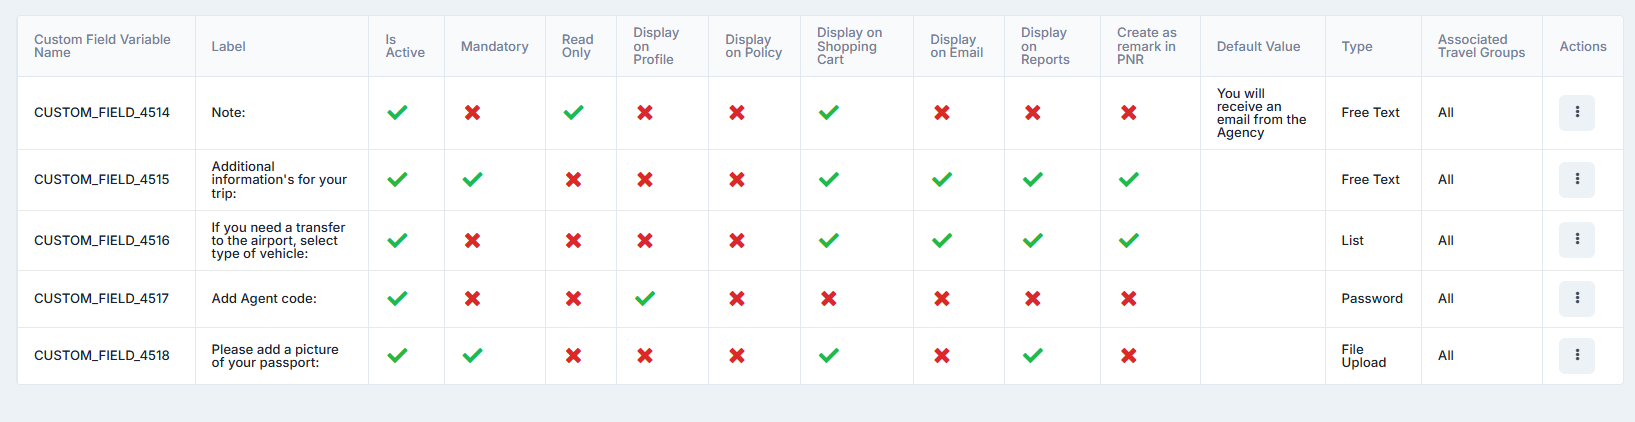
Image 14. Display of all created Custom Fields
Example
In the screenshots below you can see how all these types of custom fields will be displayed in the shopping cart, email, profile, on reports, in the remarks, and in the custom fields tab of created reservation.

Image 15. Display of all created Custom Fields in the Shopping Cart
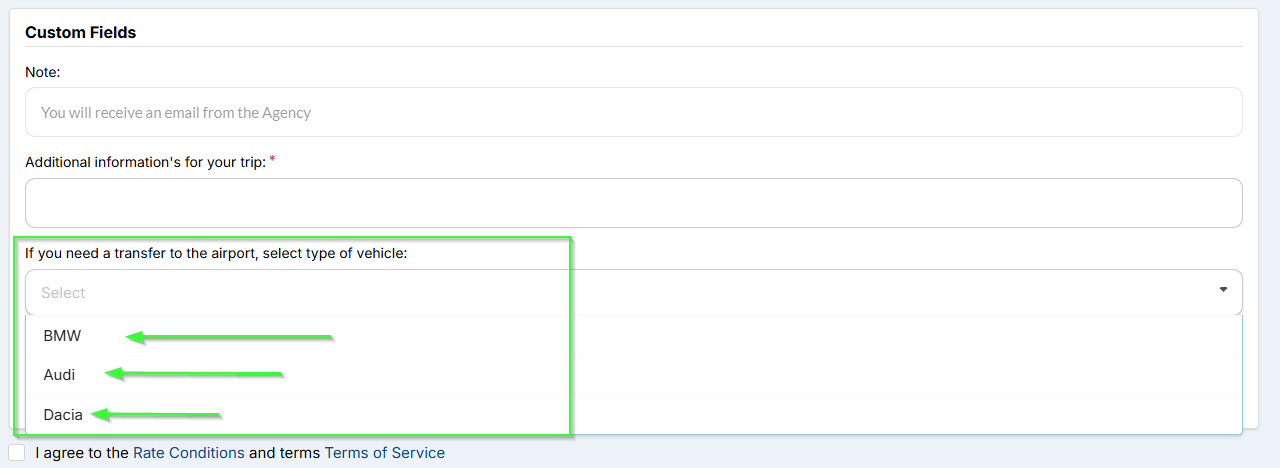
Image 16. Display of created List type of Custom Field in the Shopping Cart
Created Custom Field as a type of pattern will display in the shopping cart error if you did not put correctly the code that was previously set up. It will be written in red letters below the field your message that you previously defined when you created a pattern type of custom field, and your travelers will no what they need to enter in the field.
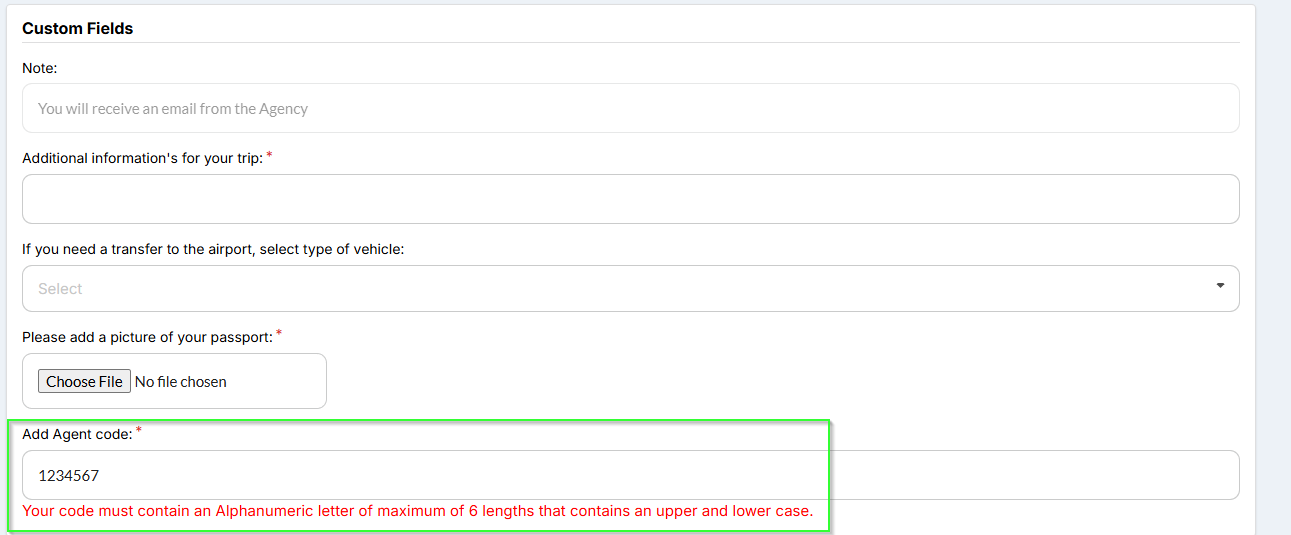
Image 17. Created Pattern type of Custom Field in the Shopping Cart
Created Custom Field Upload File will be displayed the error message in the shopping cart if someone tries to upload a file with the extensions that are not allowed. In the popup, travelers will be aware of what file extensions can be uploaded:

Image 18. Created Upload File type of Custom Field in the Shopping Cart
Image 19. Displayed custom fields for created reservations in the details of PNR
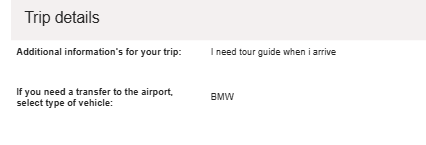
Image 20. Displayed custom fields in the email after the reservation created

Image 21. Displayed custom fields in traveler's profiles on the B2C Leisure website
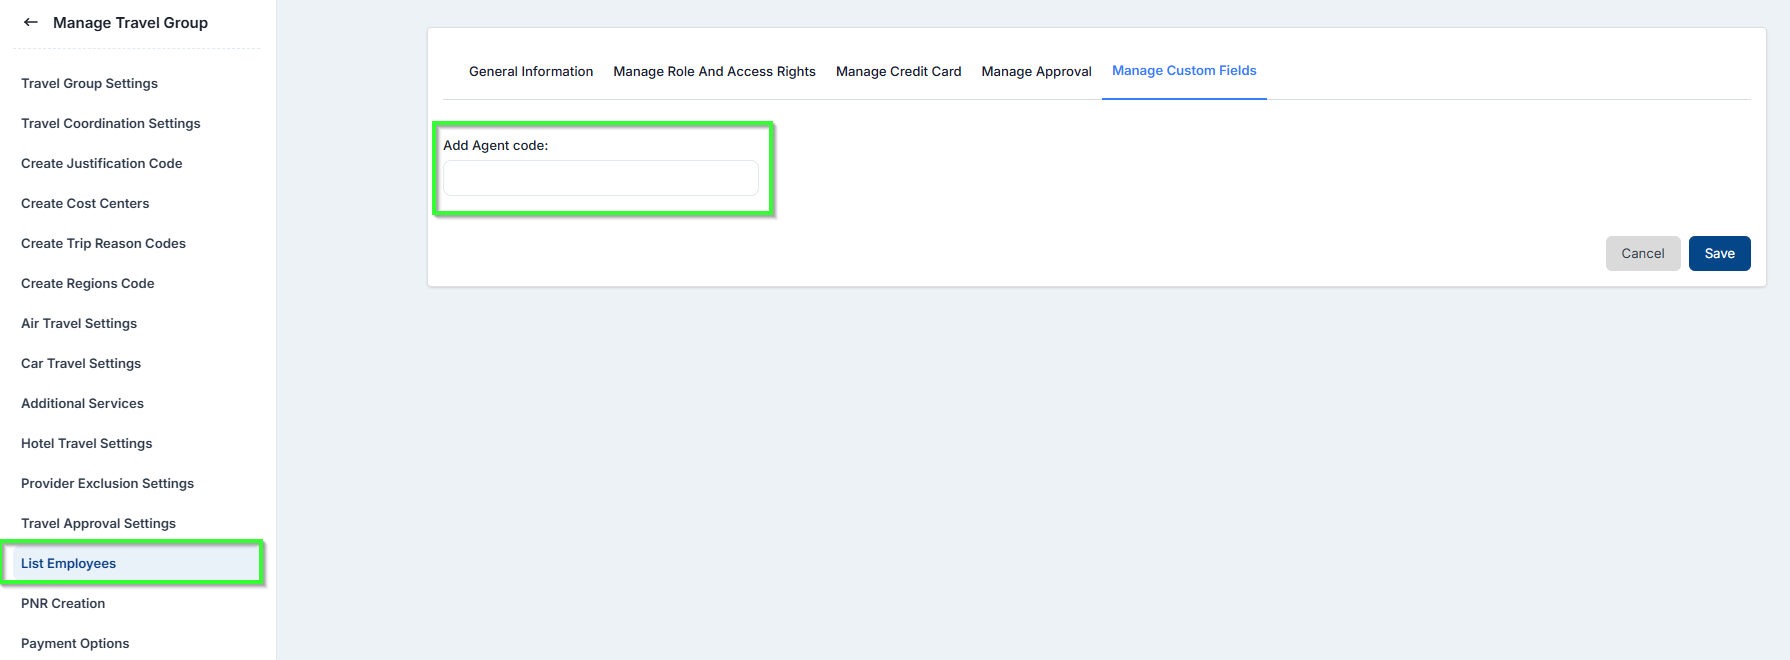
Image 22. Displayed custom fields in travelers' profiles on B2B Corporate website

Image 23. Displayed custom fields in the report downloaded from the booking tab
How to setup custom fields to the command builder
If you created a custom field that is bound to the profile, you need to create an RM for that field in the command builder if you want to have it in the PNR, see bellow screenshot:

Image 24. Displayed custom fields on Profile
When you go to the command Builder you will be able to insert VAriable, in the list you will have all your custom fields, but in our example, we will take only one that is enabled to be visible on your profile:
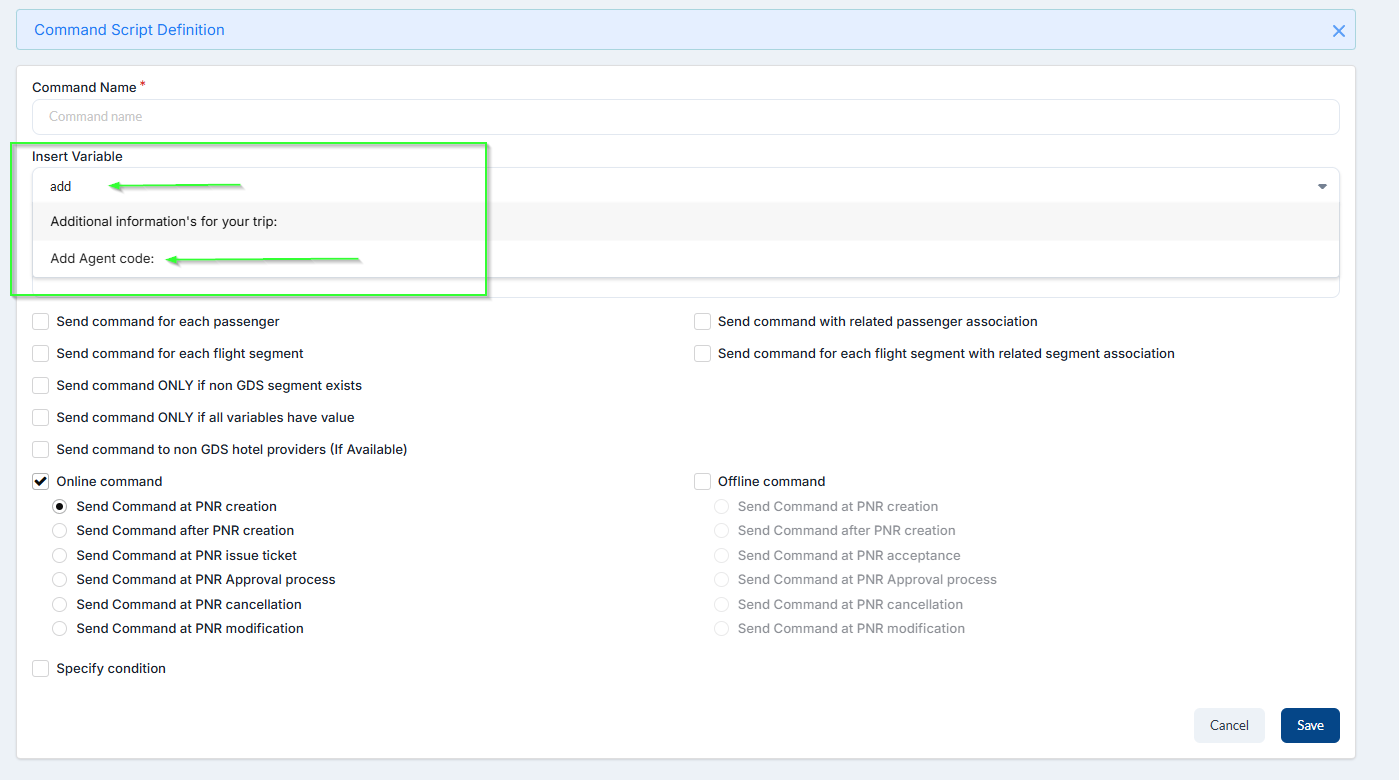
Image 25. Displayed command builder with our custom field in the dropdown of the list variables
NOTE: All custom fields will be in the list of variables in the command builder, but you don't need all of them to add to be displayed in the RM of PNR, because only custom fields that are not visible in the shopping cart need to be add through command builder if you want to have it in the PNR.
When you add a variable you will see that it will be added to the Custom Field Variable Name:

Image 26. Displayed command builder with added custom field from the list of variables